
In this detailed tutorial, we will go through all the required steps needed to be performed in order to successfully install Snipe-IT on Windows Server 2019.
This blog is updated on 19th Dec 2021. Make sure you install Visual C++ 2015-2019 Redistributable if you are planning to use PHP Version 7.3 or higher
Software Requirements:
- Server 2019 (Server 2016 or 2012 can be used as well): Evaluate Windows Server 2019
- Notepad ++
- PHP >= 7.4 (7.4 < 8 recommended) Non Thread Safe
- C++ 2015-2019
- URL Rewrite 2.1
- PHP Manager
- MariaDB Version 10.0.14
- Composer
- SNIPE-IT
- Check requirements on the official Snipe-IT documents
Table of Contents
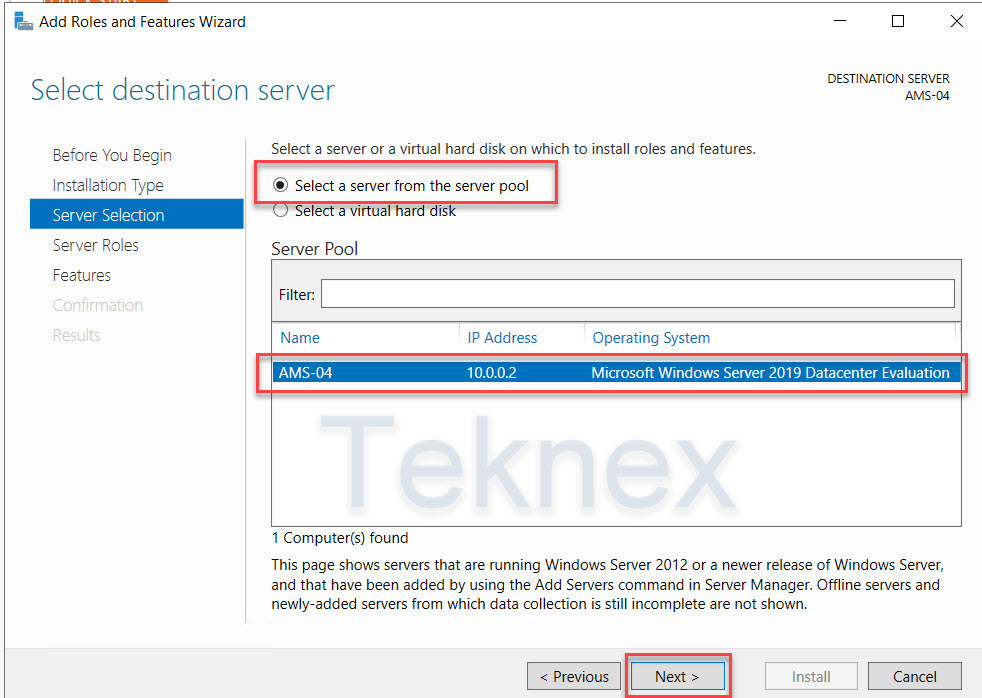
1. Server 2019 Setup
It can be a virtual machine or a physical server. Make sure you have a static IP address assigned and a working Internet connection.
In our example:
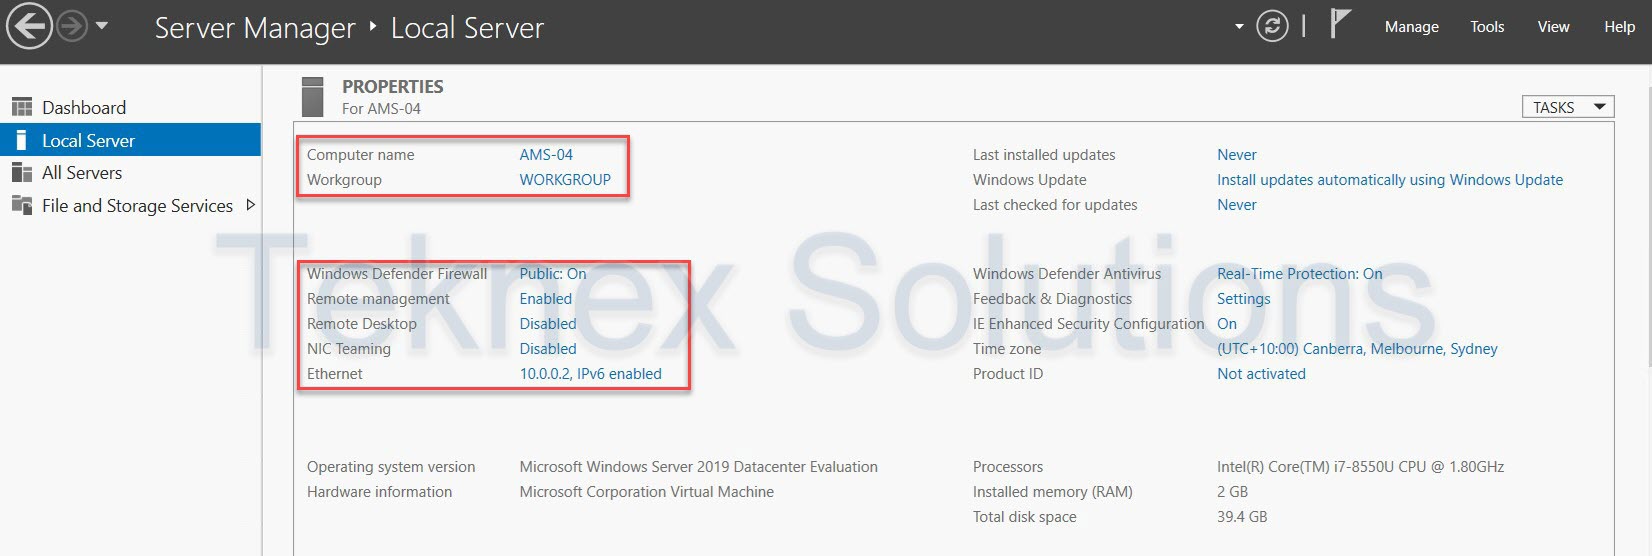
- Server Name: AMS-04
- IP Address: 10.0.0.2
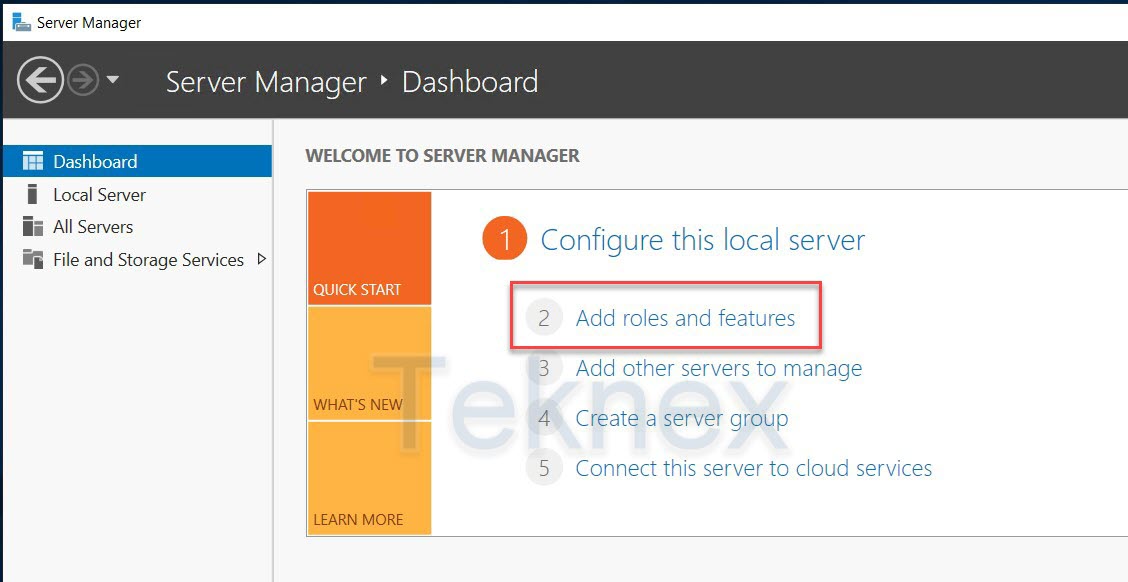
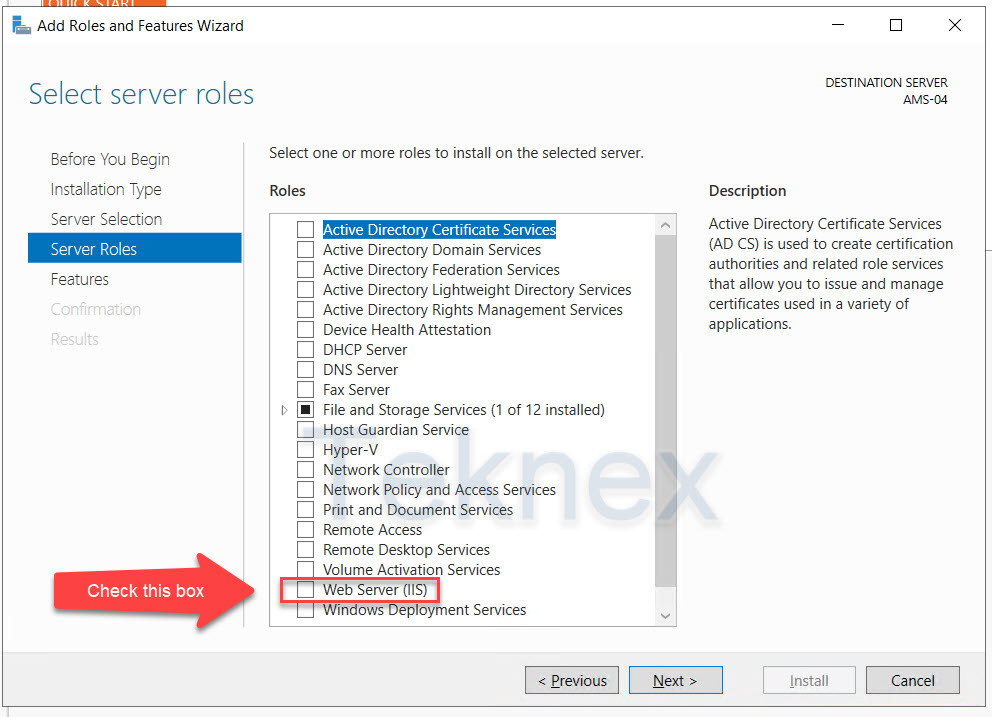
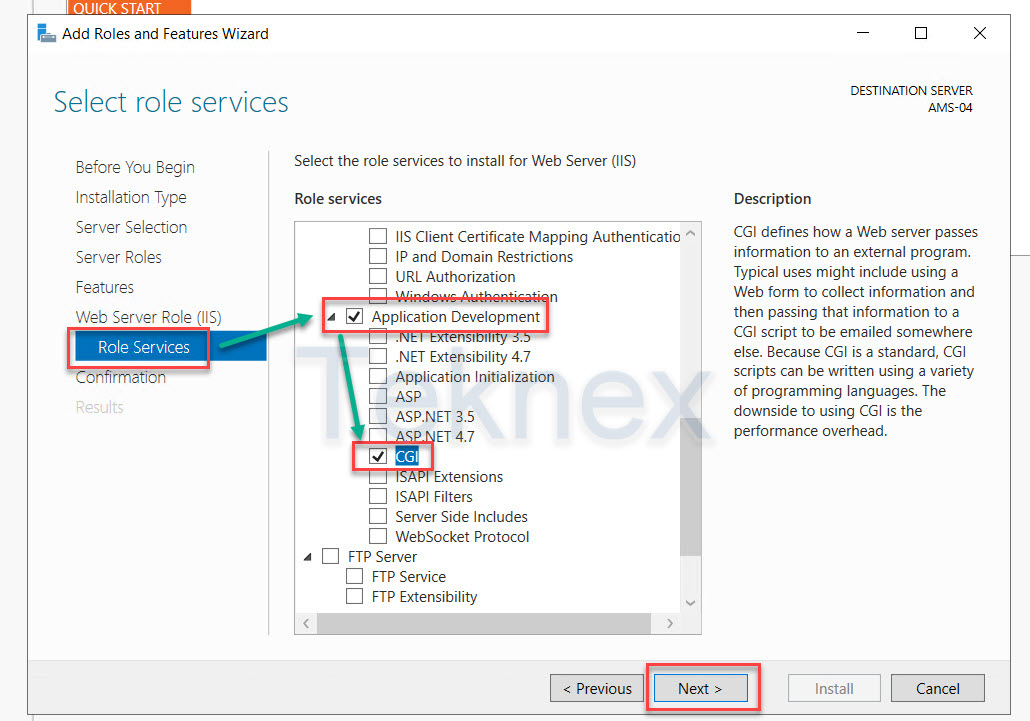
2. IIS Server and CGI Roles
Let’s add required roles to our server.
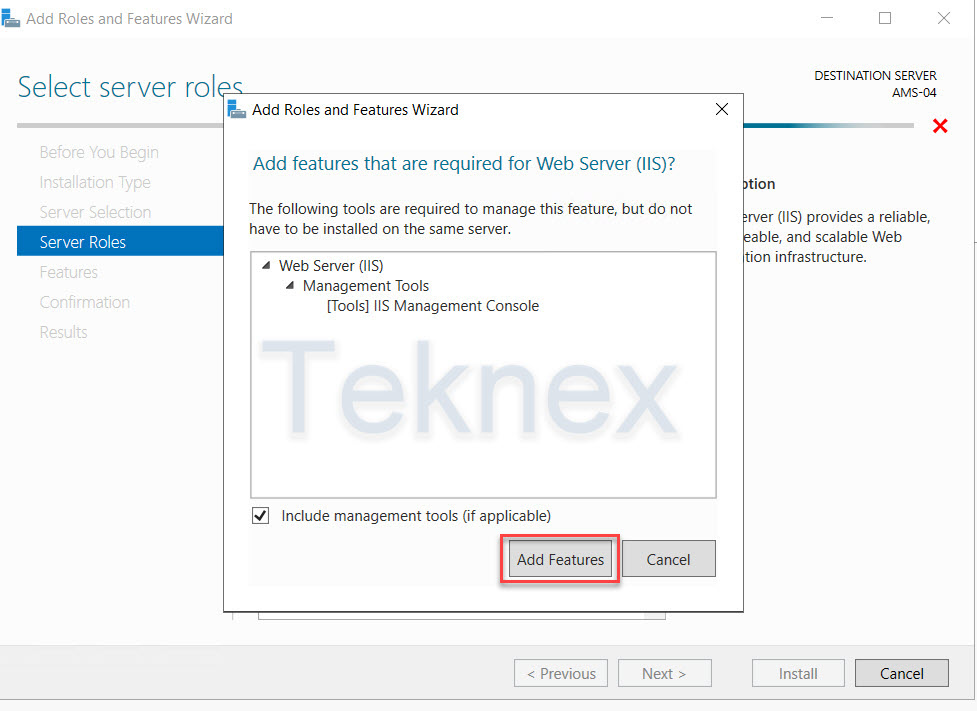
- Open Server Manager and add IIS Server Role and CGI feature in Applications Development

3. Install Visual C++ 2015-2019
- Run downloaded exe file and follow the prompts

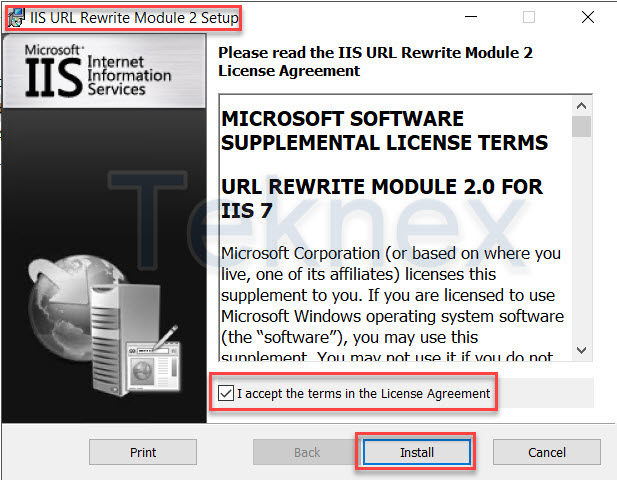
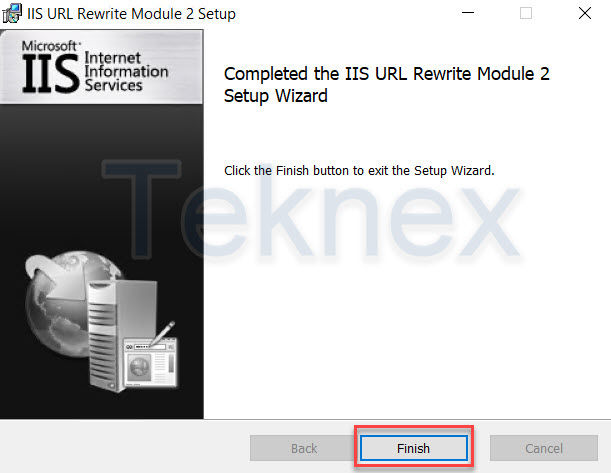
4. Install URL Rewrite
Run the downloaded exe file. Depends on the download you might need working Internet connection.
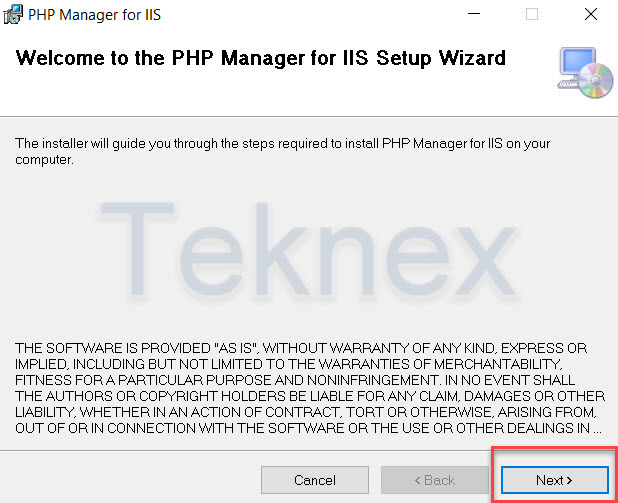
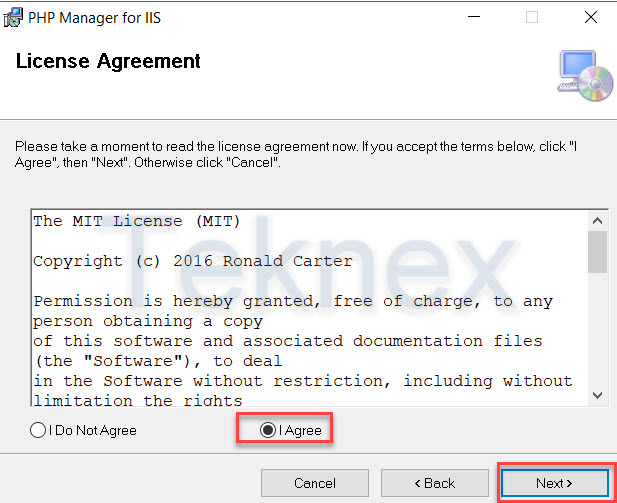
5. Install PHP Manager
Download PHP Manager and install it from downloaded msi file.
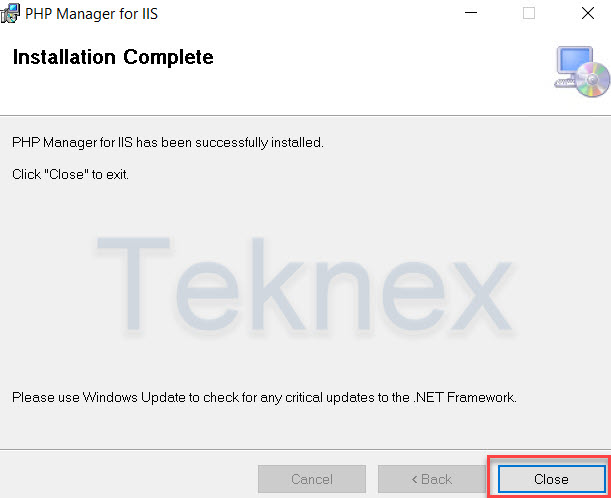
Test PHP Manager Installation
6. PHP Installation
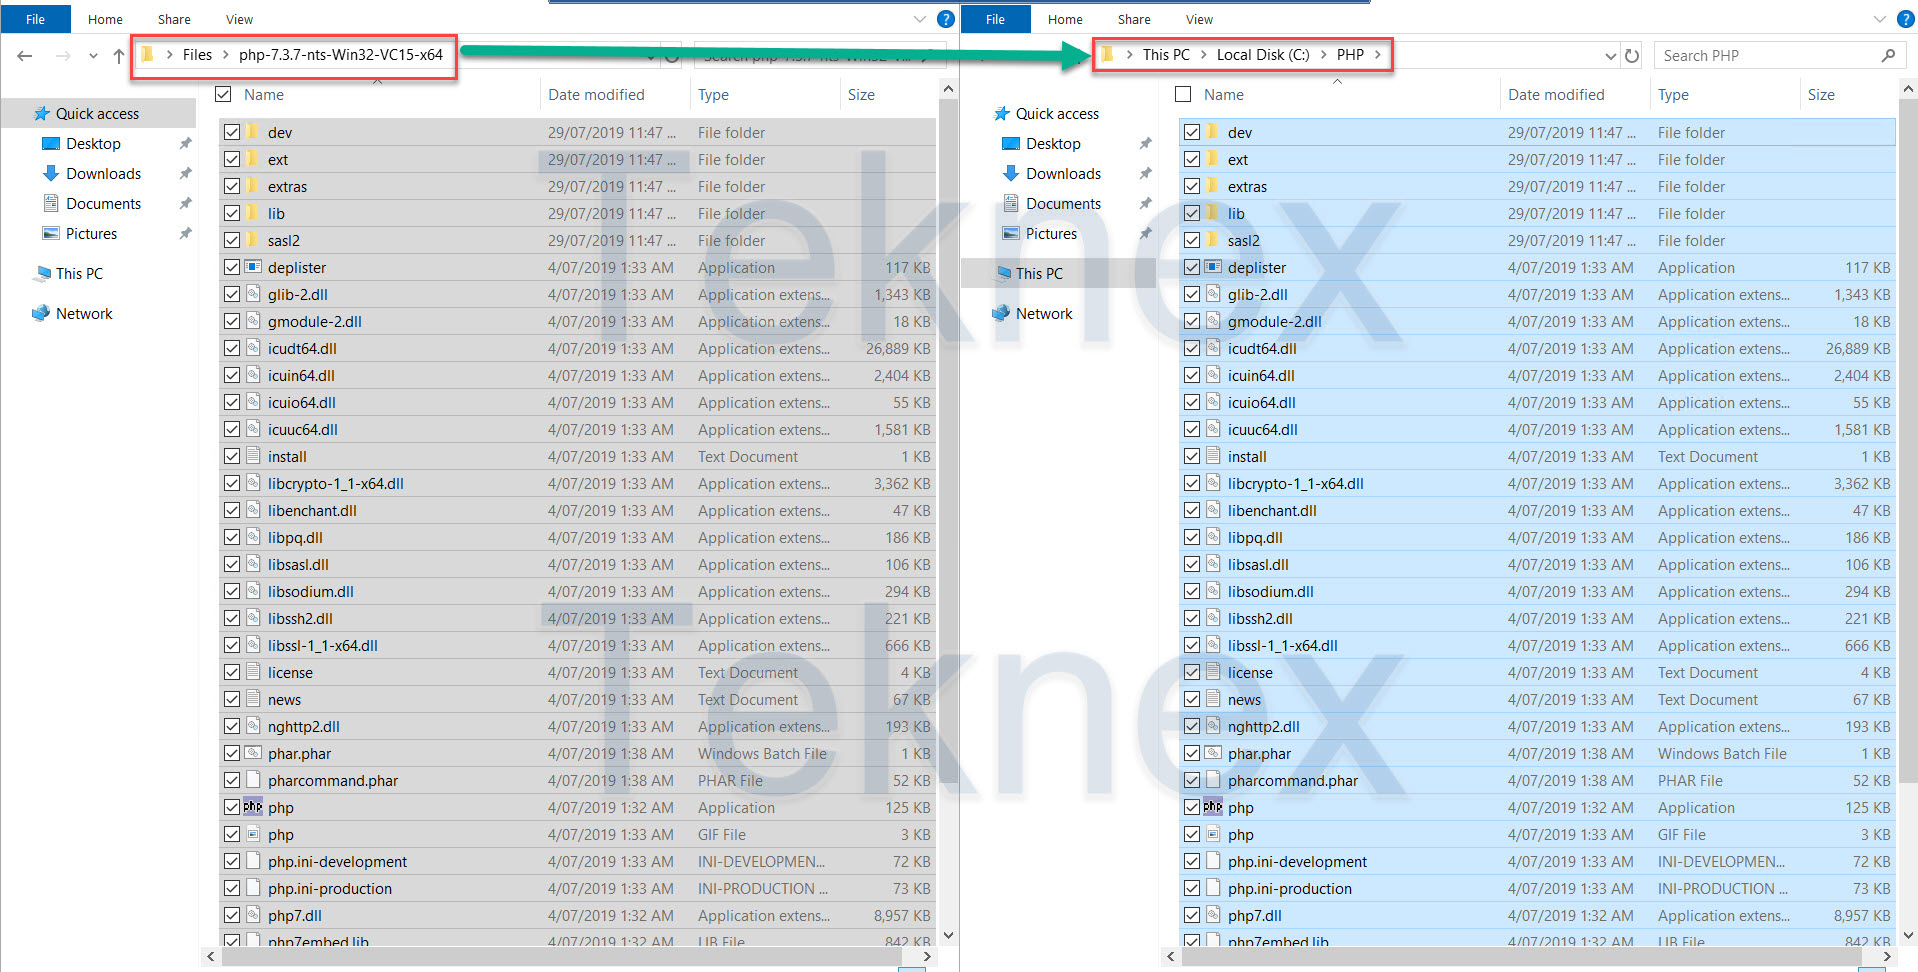
- Download PHP , In this tutorial I have used 7.3.7 Non Thread Safe x64
- Check what version is required from SNIPE-IT PHP requirements
- Create a new folder “PHP” in the System Drive. In the most cases it is C: Drive.
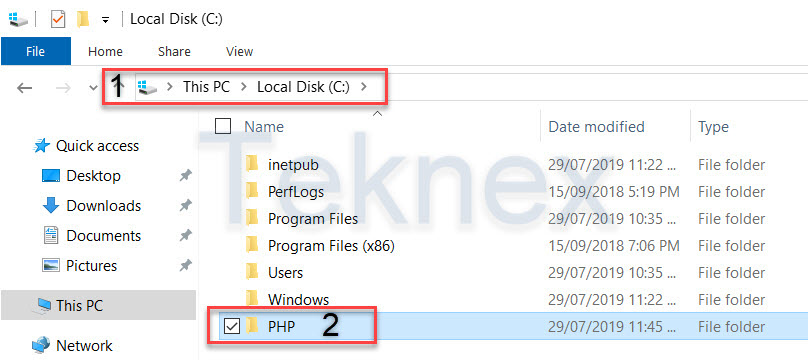
- Copy all data from original downloaded folder PHP.7.*.* to C:PHP
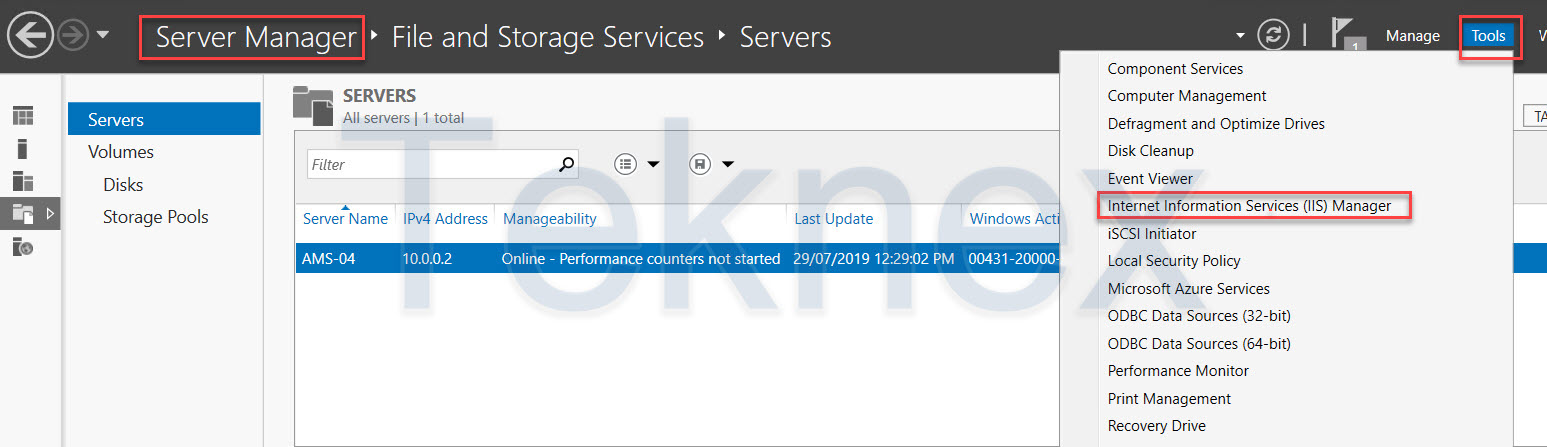
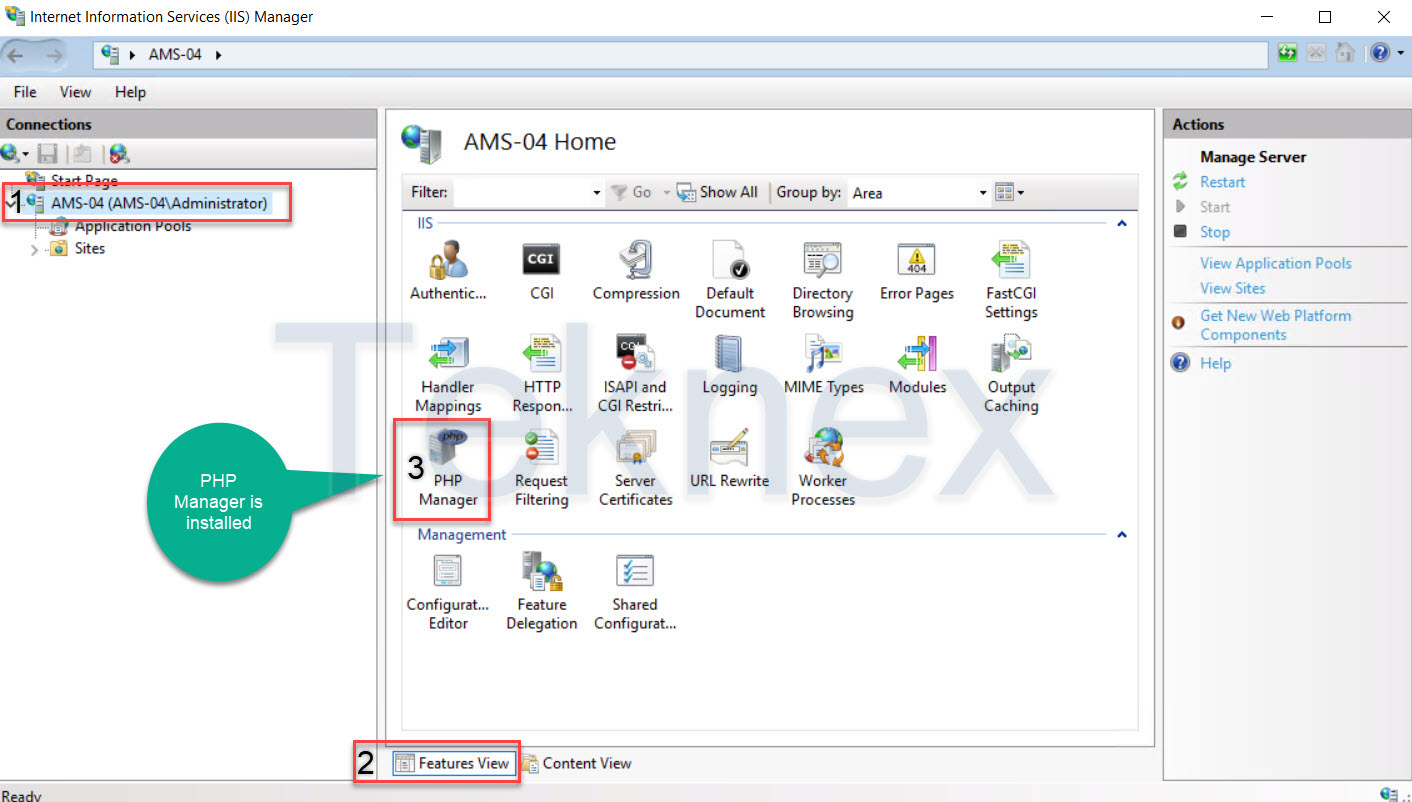
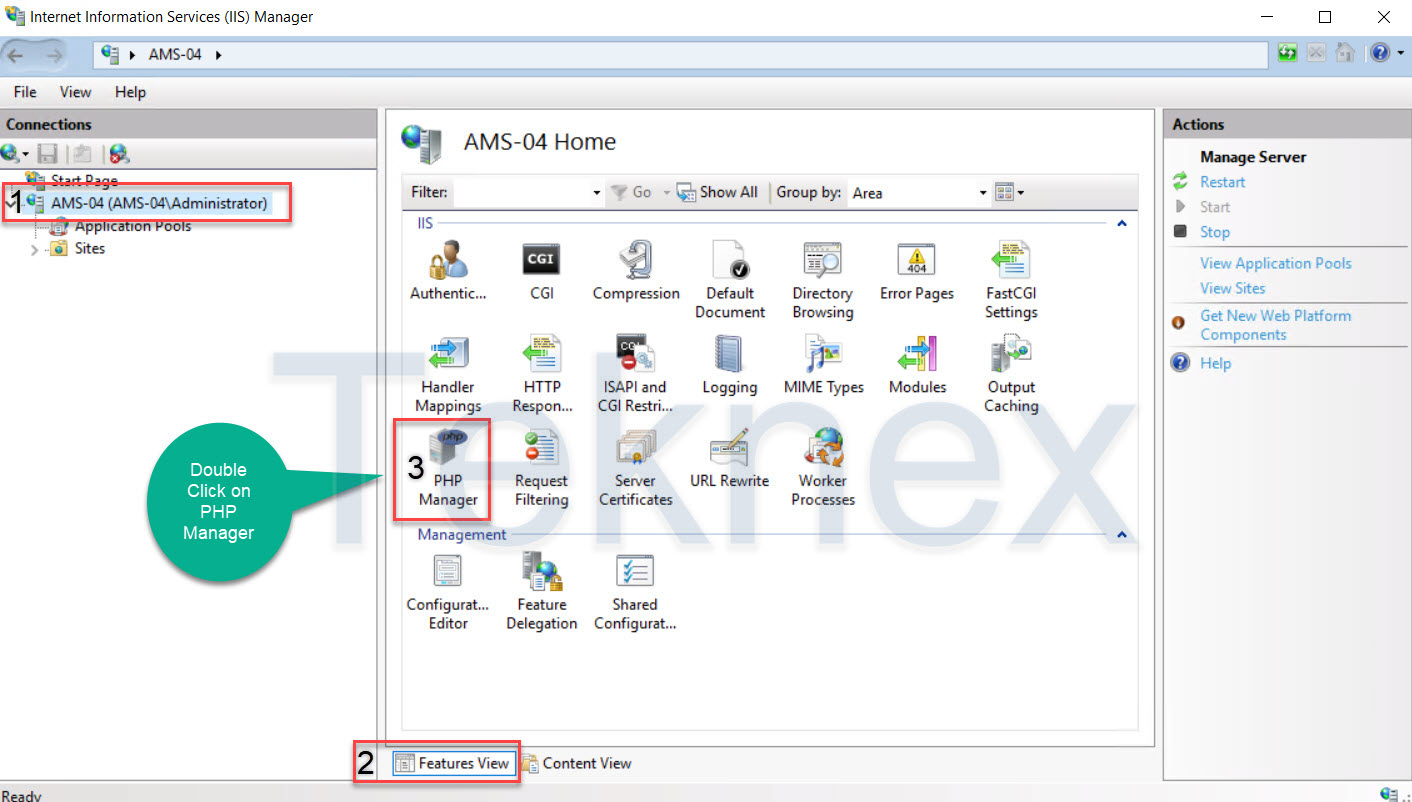
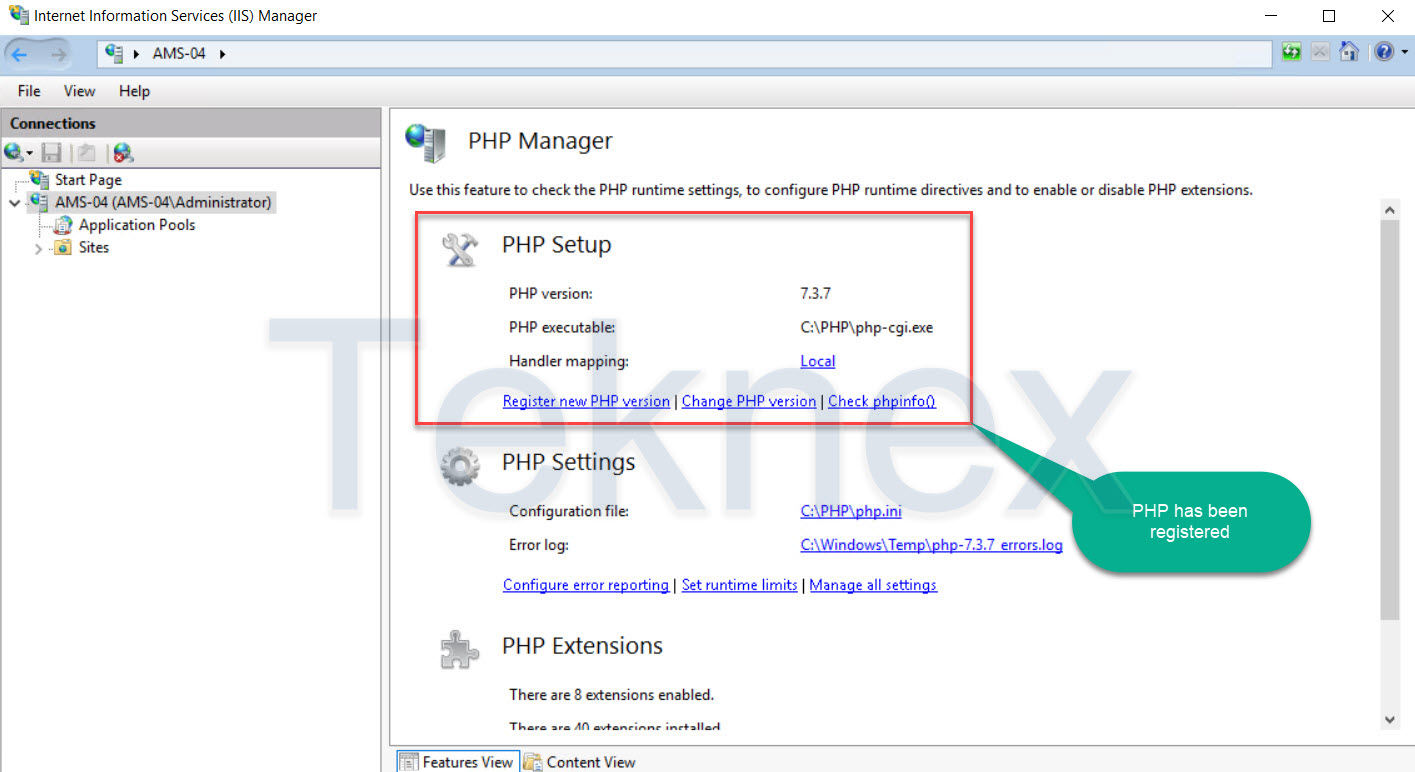
- Open IIS Server Manager
- Click on your Server Name and you will see the following Window.
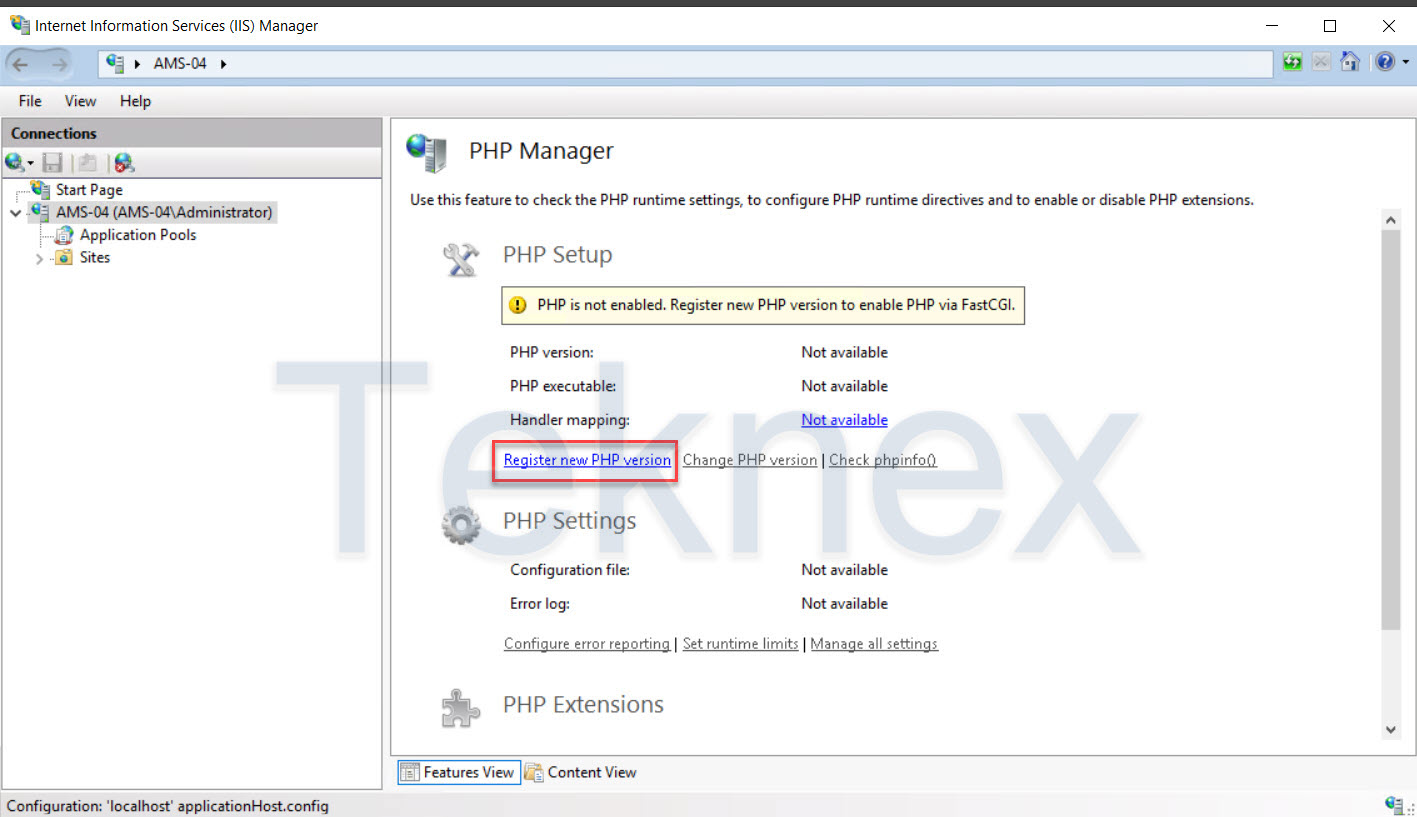
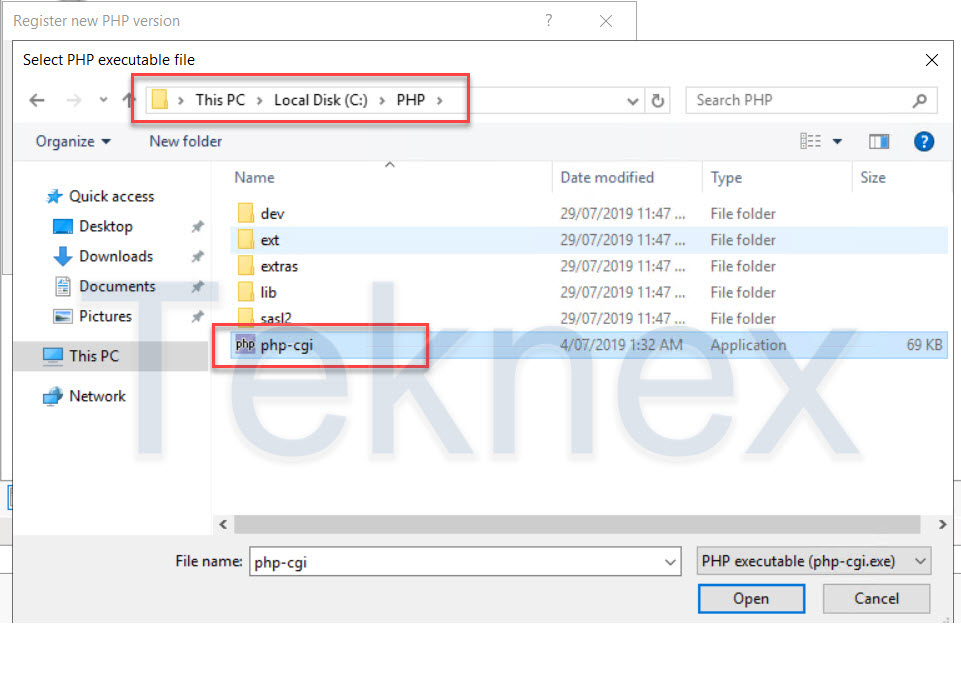
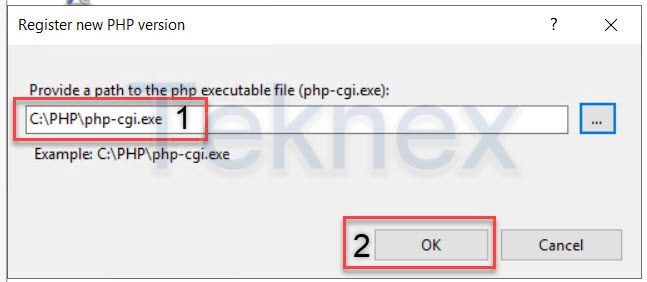
- Double click on PHP Manager and register new PHP-CGI.EXE. You will find PHP-CGI.EXE file in C:\PHPPHP-CGI.EXE. Follow the steps below to accomplish this task.

Test PHP Installation
There are two ways in which PHP could be tested.
- First Method (this test will be enough)
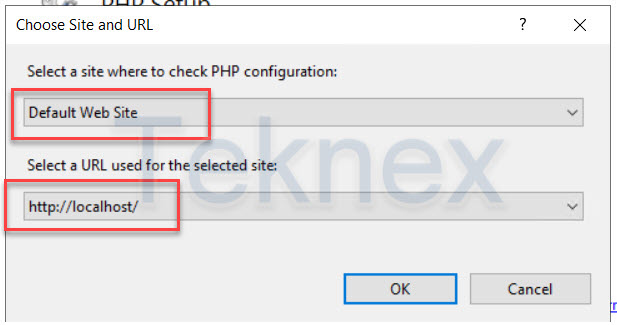
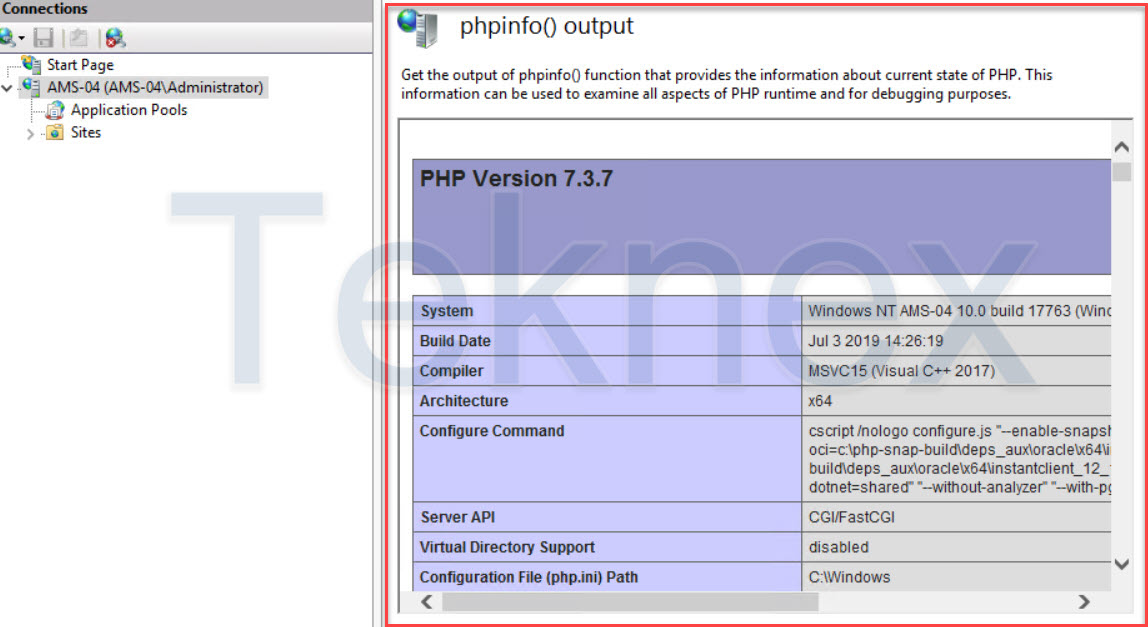
It can be tested within IIS Manager.

- Second method
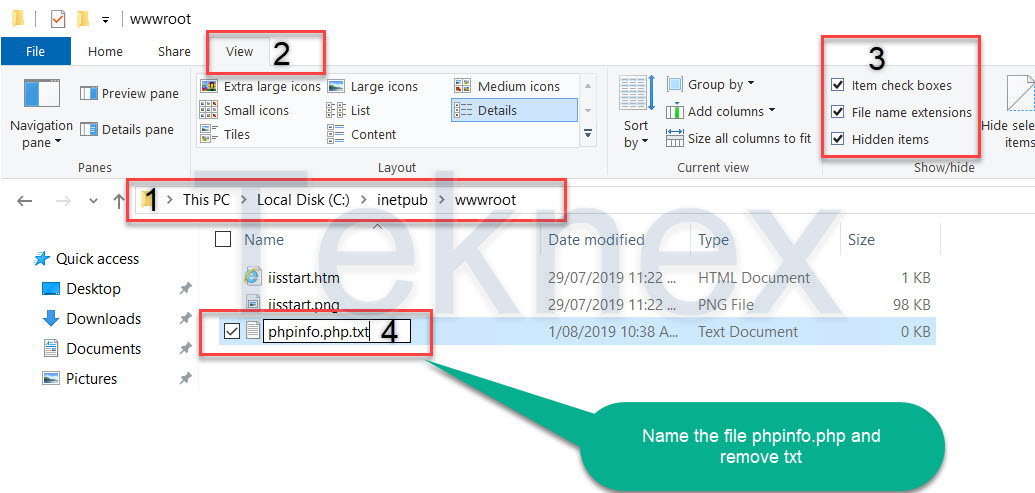
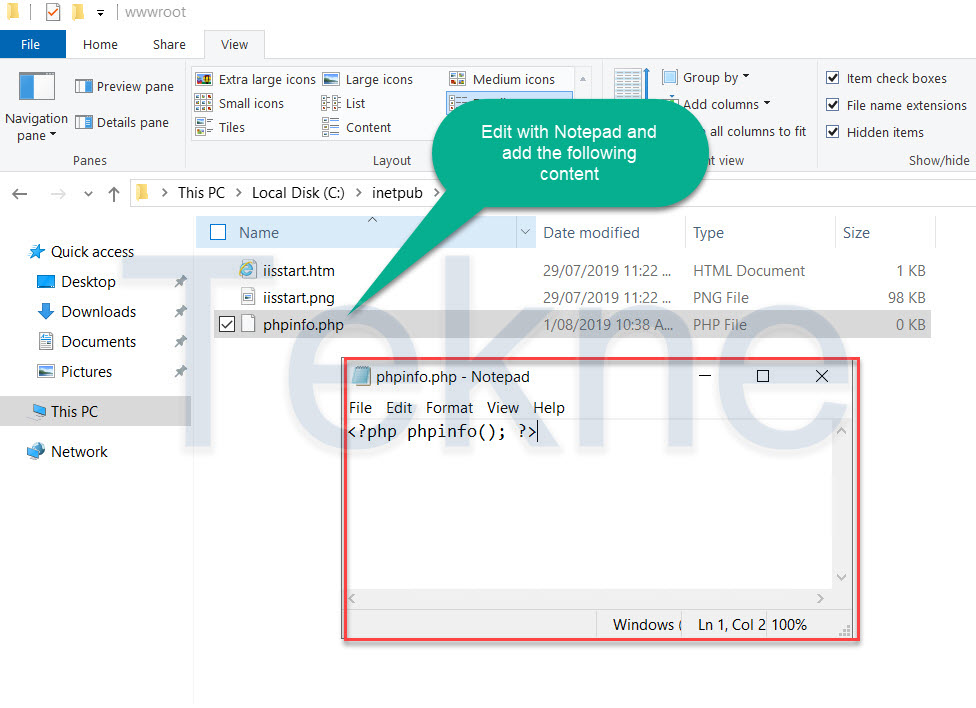
A separate text file you could create within c:\inetpub\wwwroot > name it phpinfo.php > Edit with notepad and add this content without quotation marks
“<?php phpinfo(); ?>“
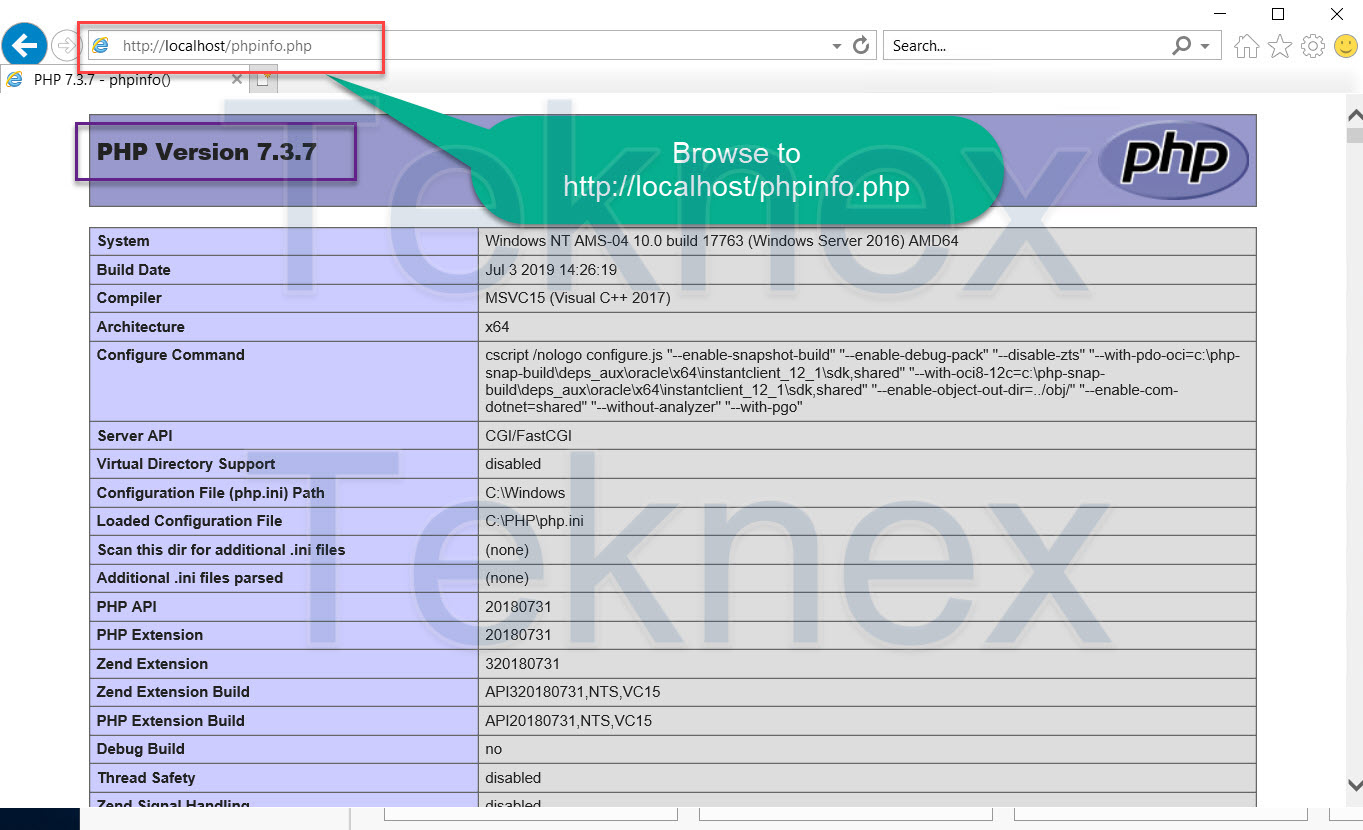
You might need to restart your IIS Server through IIS Server Manager is some cases before you open http://localhost/phpinfo.php
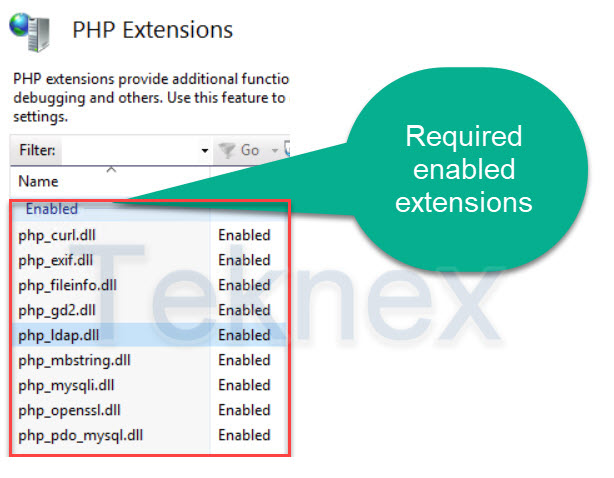
Enable/Disable PHP Extensions
- Open IIS Manager
- Click on your Server Name > Open PHP Manager
- Disable following extensions leave other enabled extensions as enabled
php_gettext.dll
php_soap.dll
php_xmlrpc.all
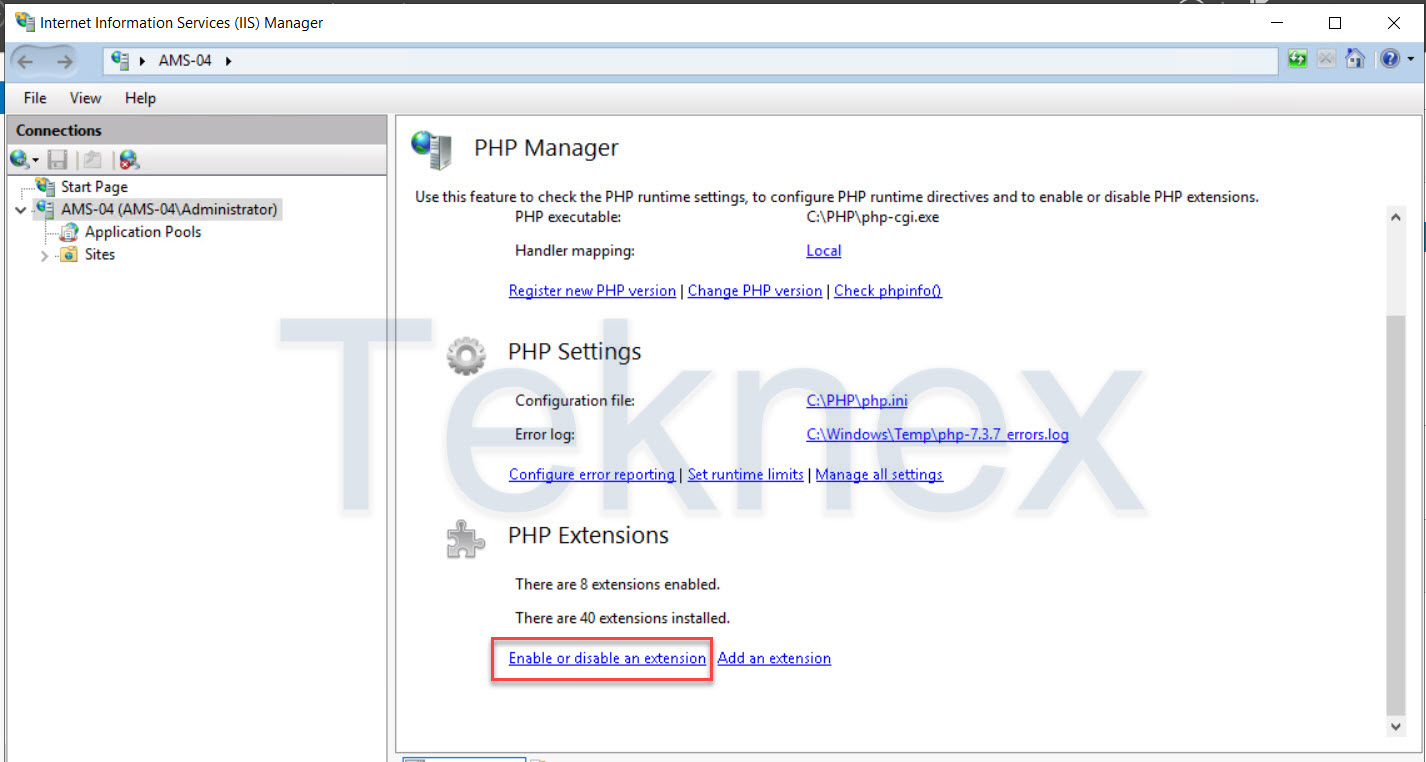
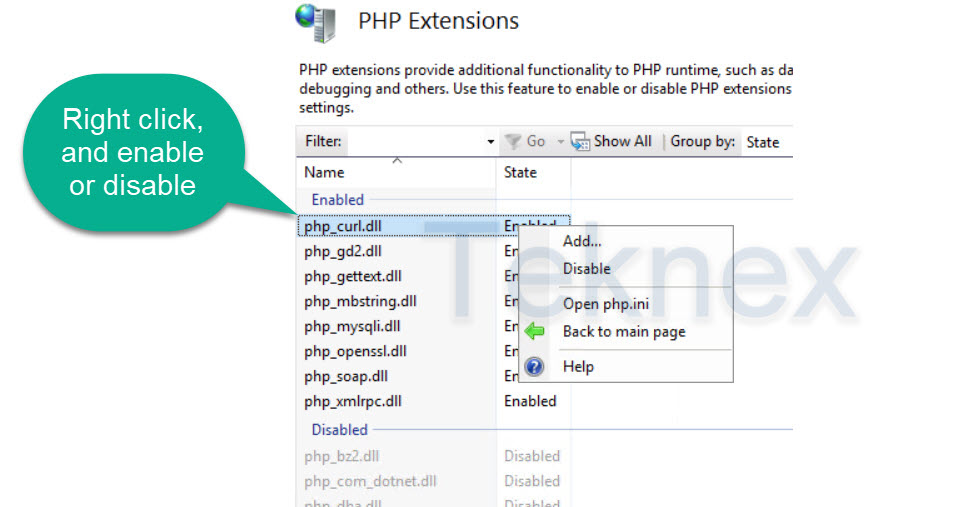
- Enable following extensions in addition to already enabled extensions
php_exif.dll
fileinfo.dll
php_pdo_mysql.dll
php_ldap.dll
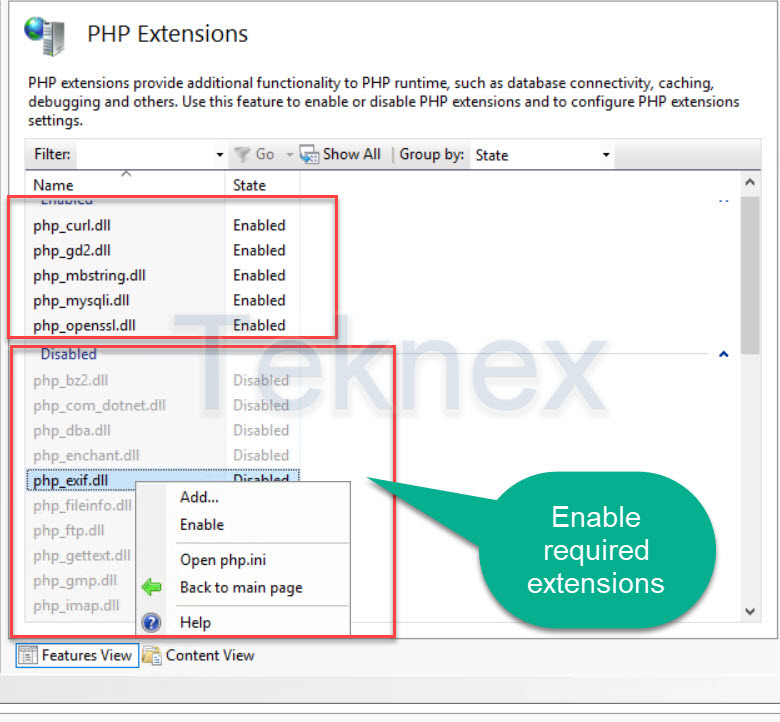
After enabling and disabling, you will end up with the following extensions.
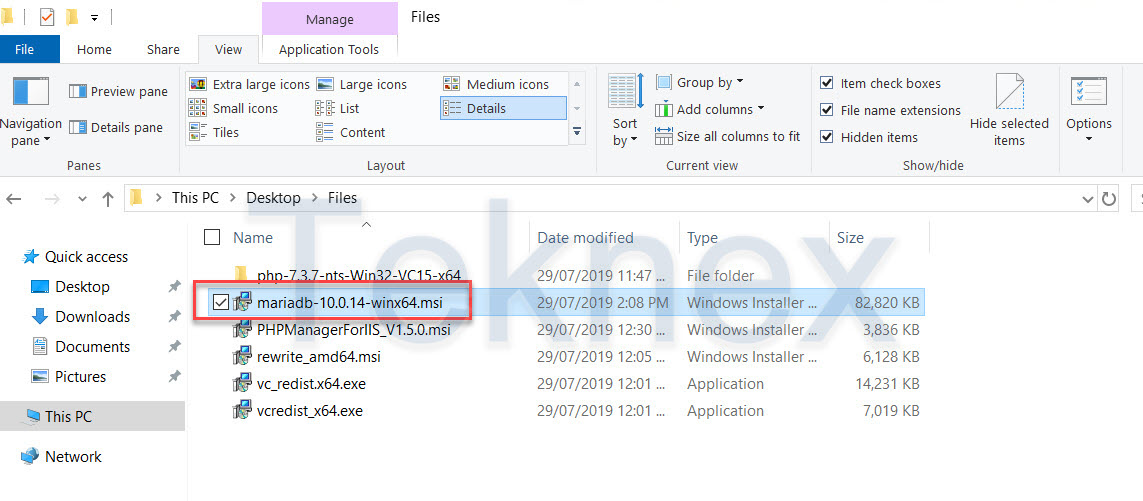
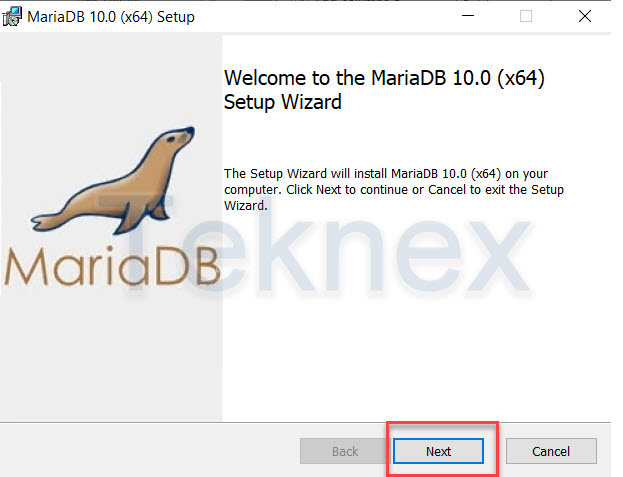
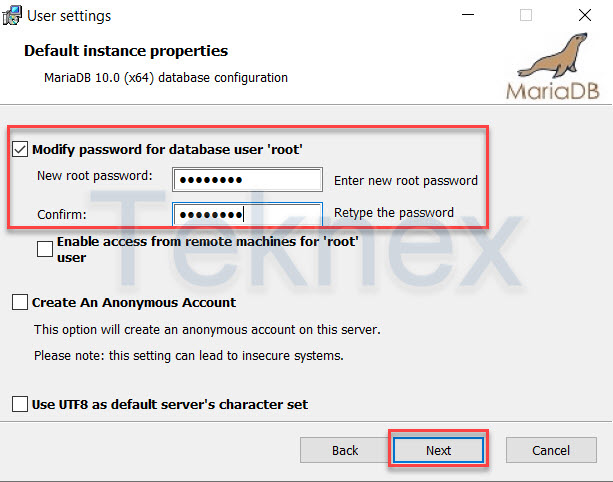
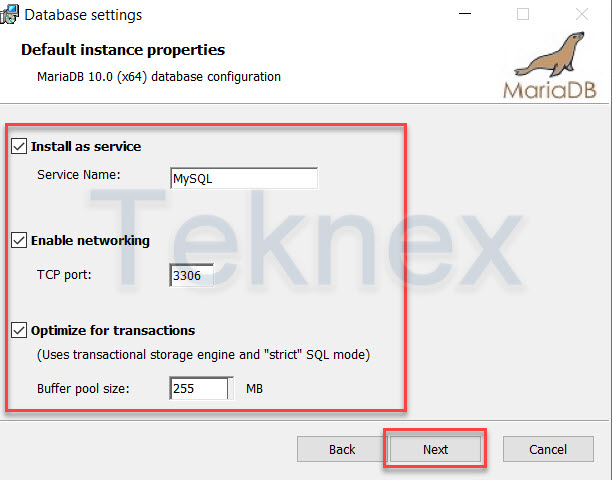
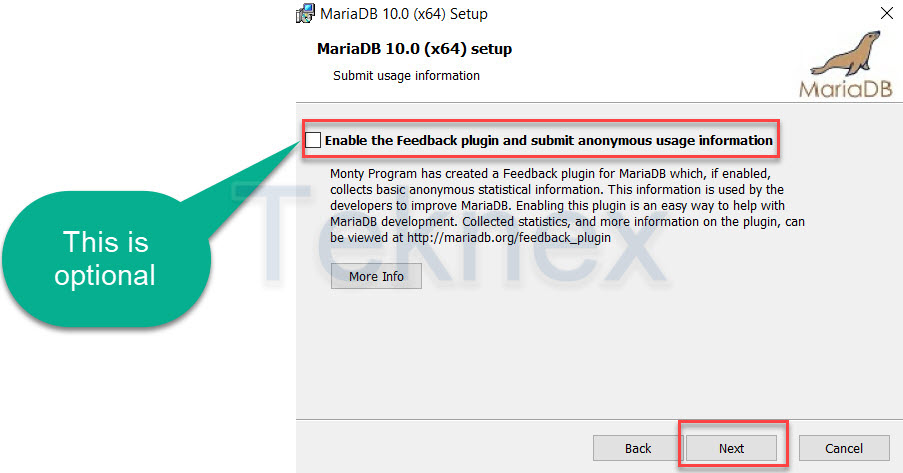
7. MariaDB installation
- SNIPE-IT Requirements – SNIPE-IT recommends 10.0.14.
- MariaDB Download
- Download msi file

- Run downloaded msi file and follow the prompts
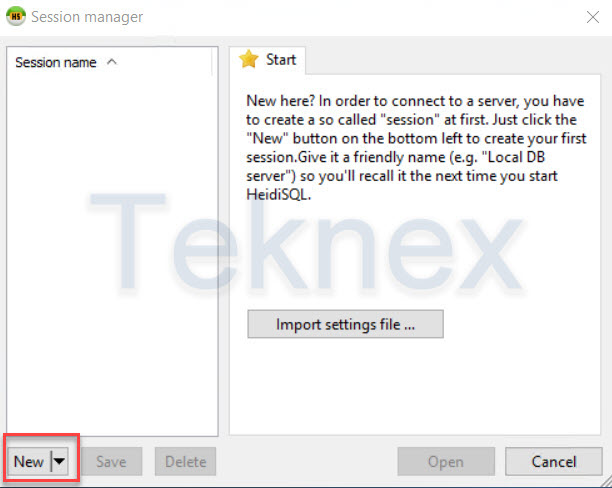
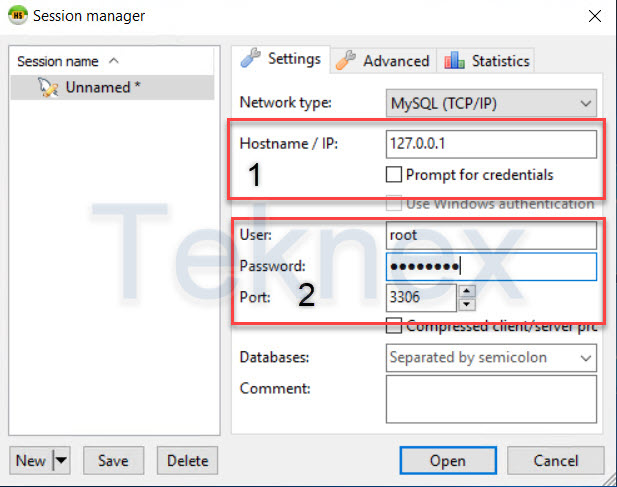
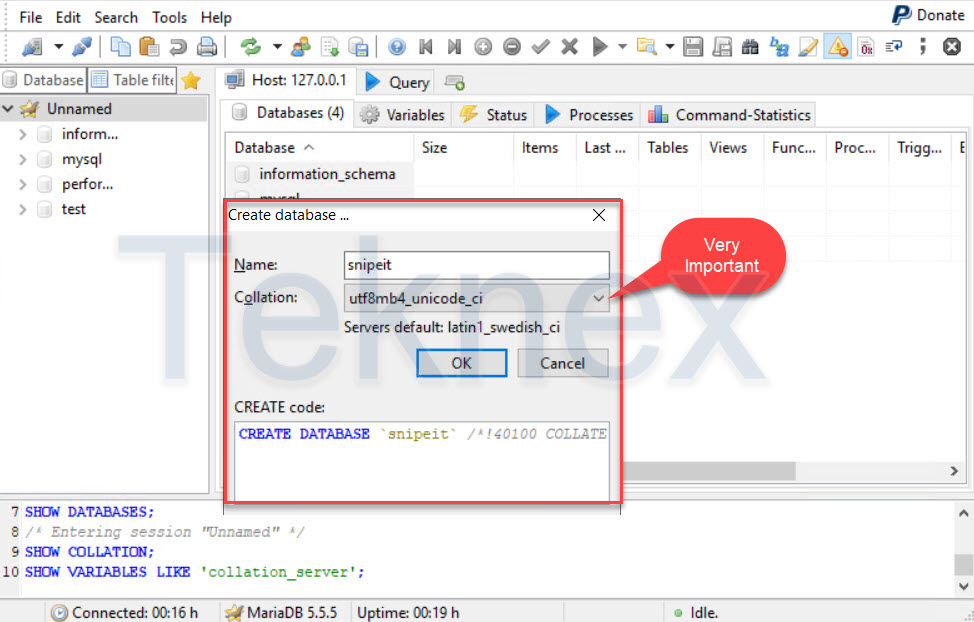
- Database Setup
- Double click on HeidiSQL shortcut or search it in the Start Menu > Applications
- Start a new session and use root credentials to login
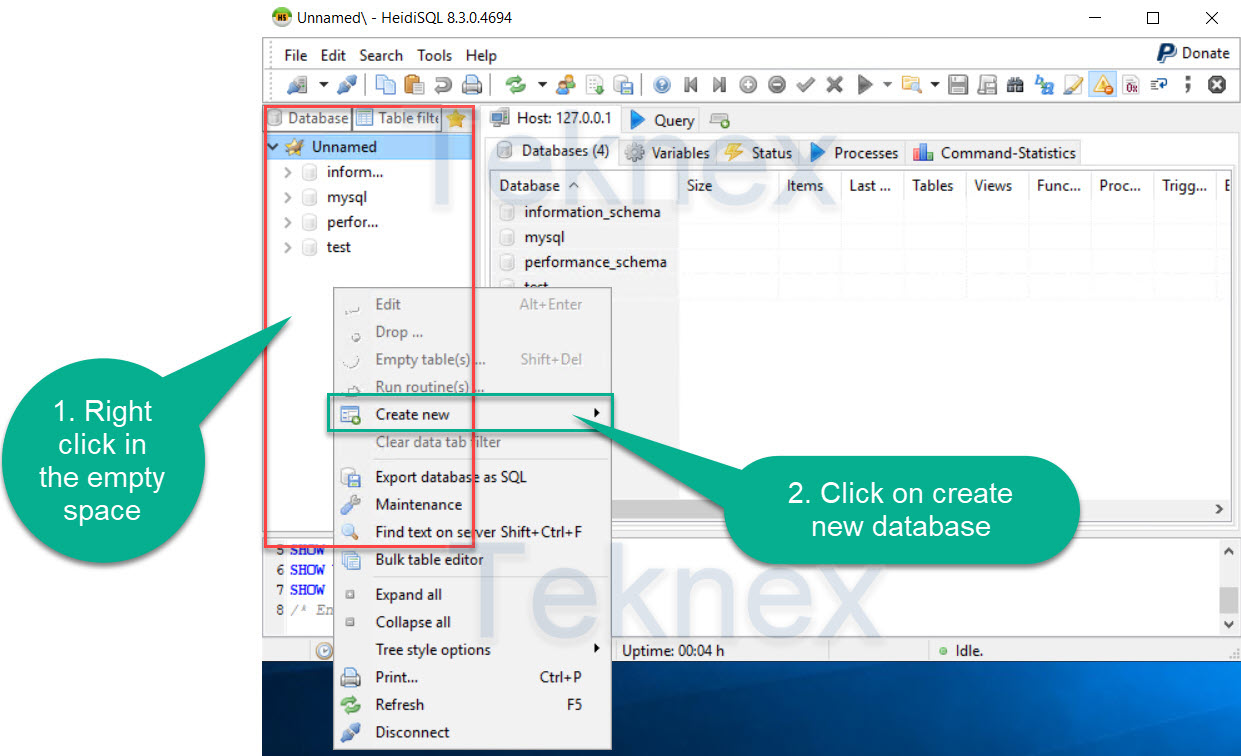
- Create a new database, name it snipeit
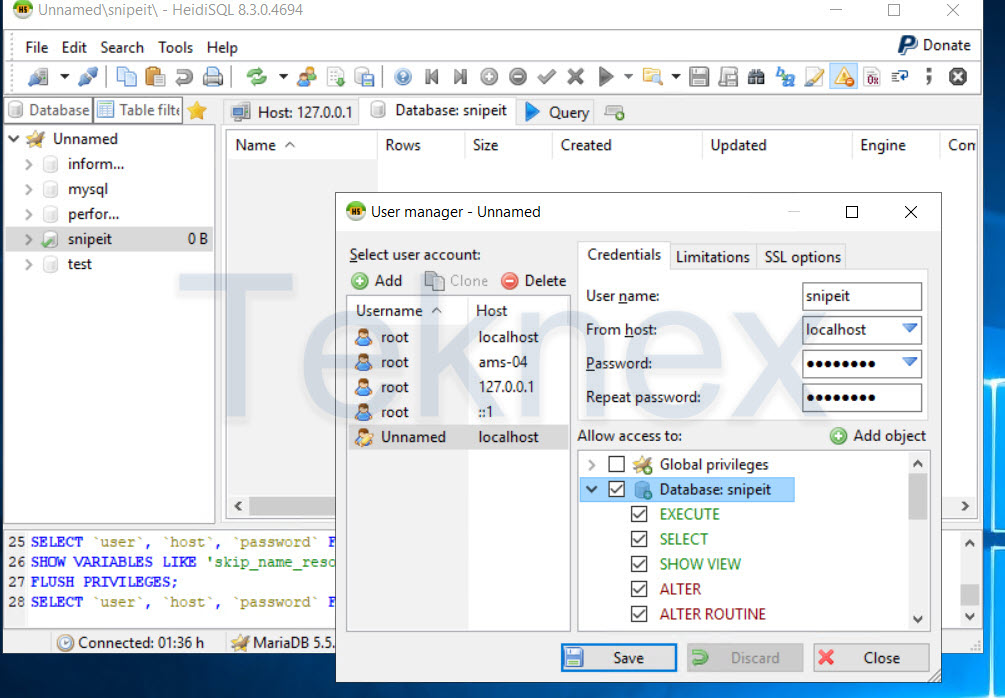
2. Create New User
- Create a new user, name it snipeit
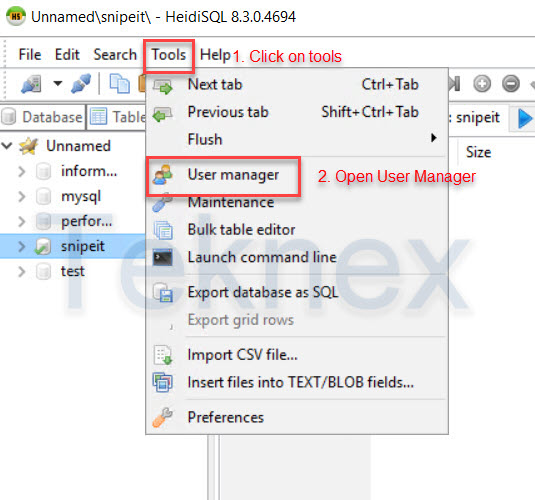
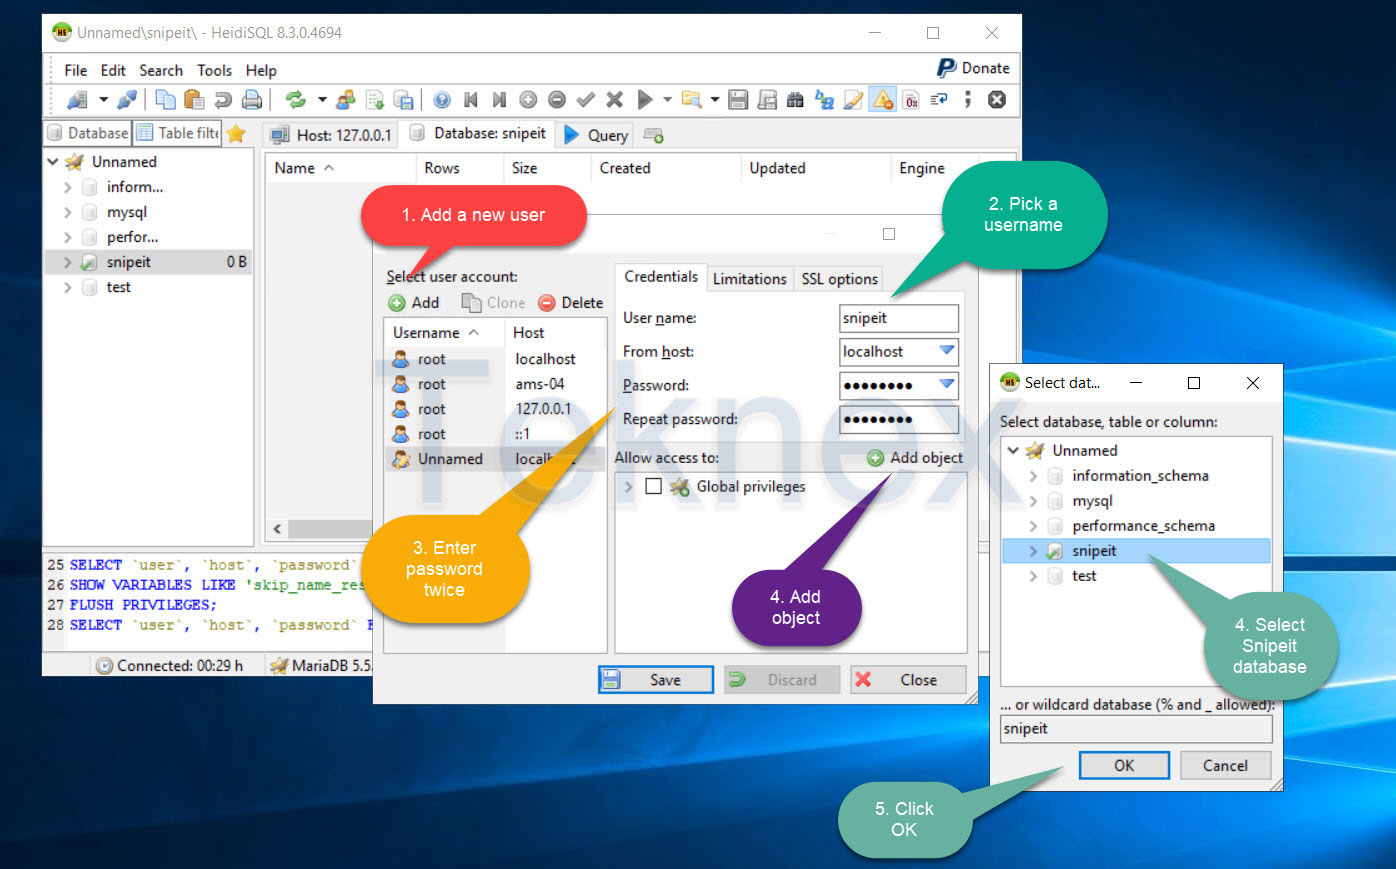
- Change user permissions and provide full access to database snipeit
8. Configure Snipe-IT Root Folder
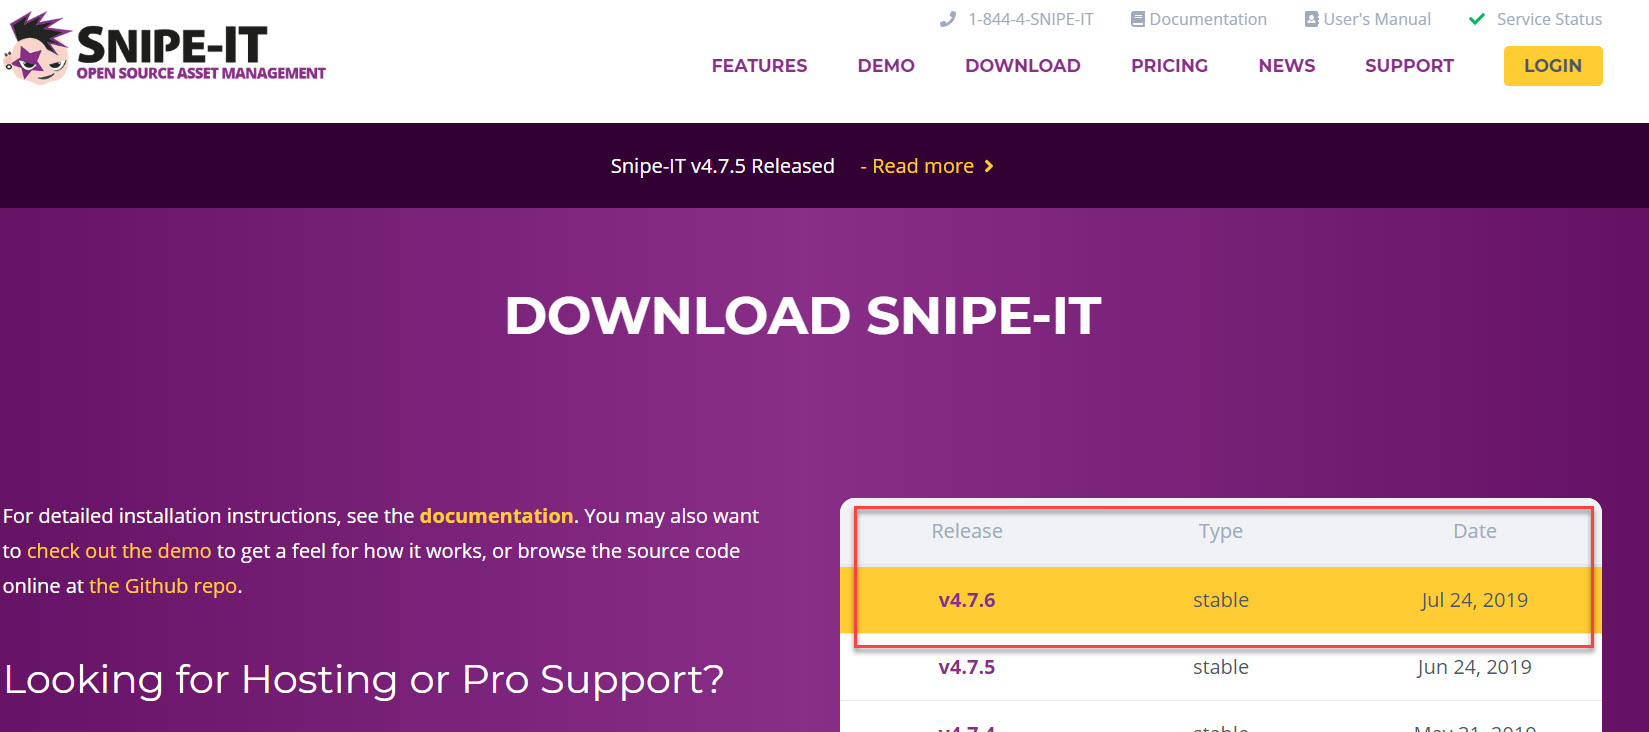
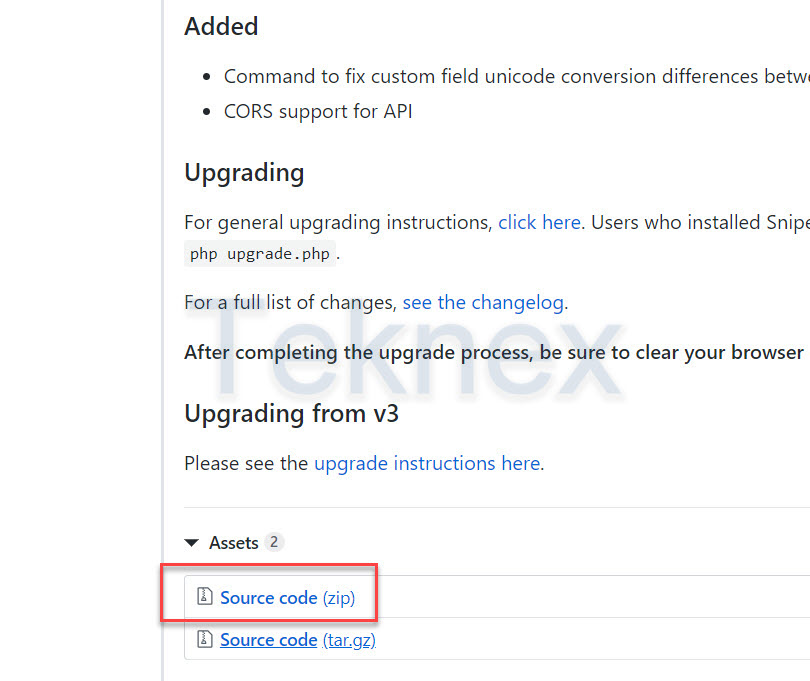
- Download the latest version of Snipe-it
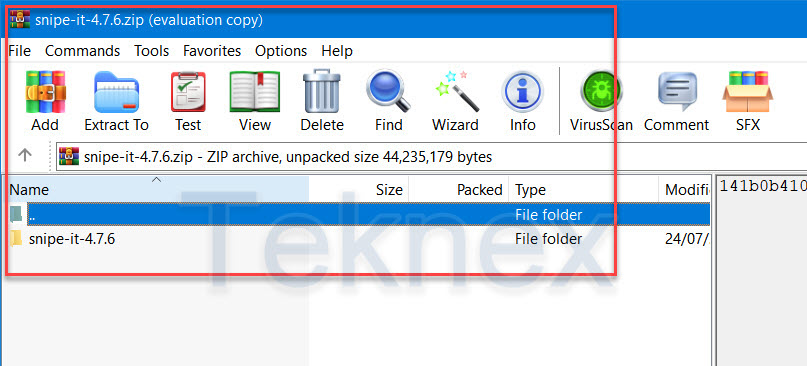
- Extract the files from the zip folder
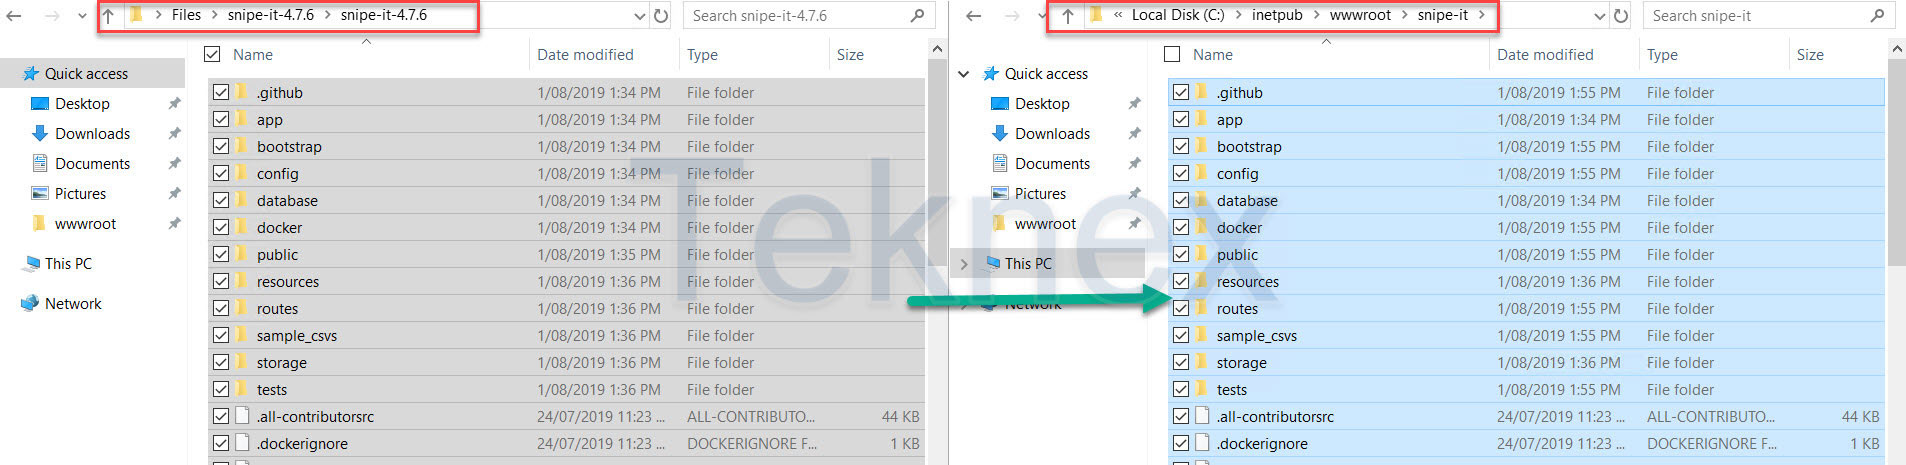
- Create a new folder c:\inetpub\wwwroot\snipeit
- Copy all files and folders from downloaded snipeit to c:\inetpub\wwwroot\snipeit
9. Update environmental file
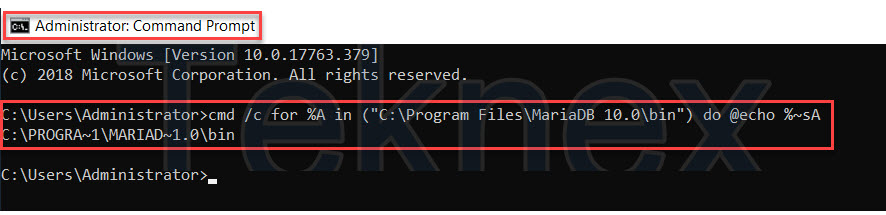
Find DB Dump Path (It will be needed in the .env file)
Follow the below steps to find the DB_DUMP_PATH
- Find where MariaDB is located, in my case, it is C:\Program FilesMariaDB\10.0\bin.
- To find MariaDB bin folder location, open Command Prompt as administrator and run the following command without quotations:
“cmd /c for %A in (“C:\Program Files\MariaDB 10.0\bin”) do @echo %~sA”
cmd /c for %A in ("C:\Program Files\MariaDB 10.0\bin") do @echo %~sA
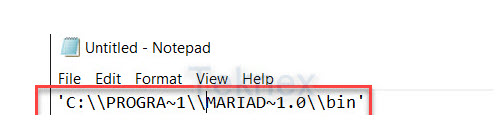
The output would be the DB_DUMP_PATH, copy that path. In my case, it was the following
C:PROGRA~1MARIAD~1.0bin
Save this output in a text file as below
'C:\\PROGRA~1\\MARIAD~1.0\\bin'
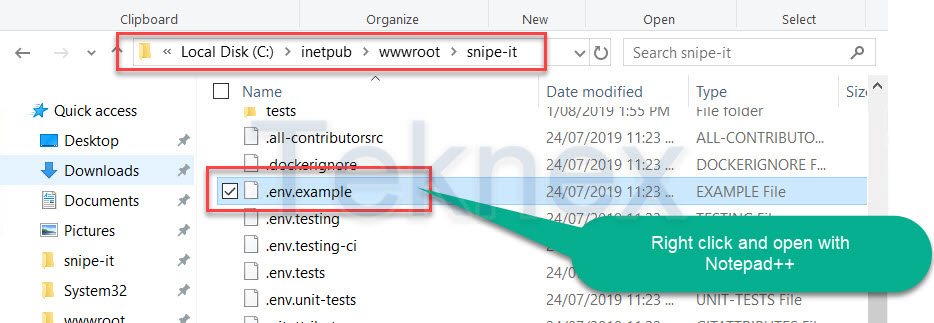
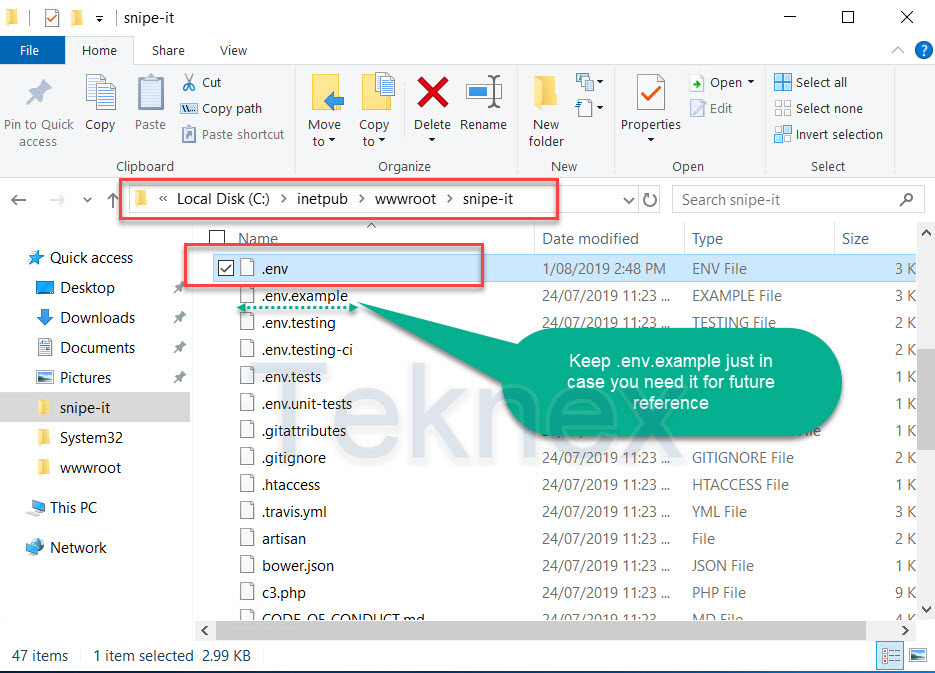
Open .env.example with Notepad++, .env file is located in the Snipe-IT root folder
- Update required fields as shown in the screenshot
– APP_URL
– DB_DATABASE
– DB_USERNAME
– DB_PASSWORD
– DB_DUMP_PATH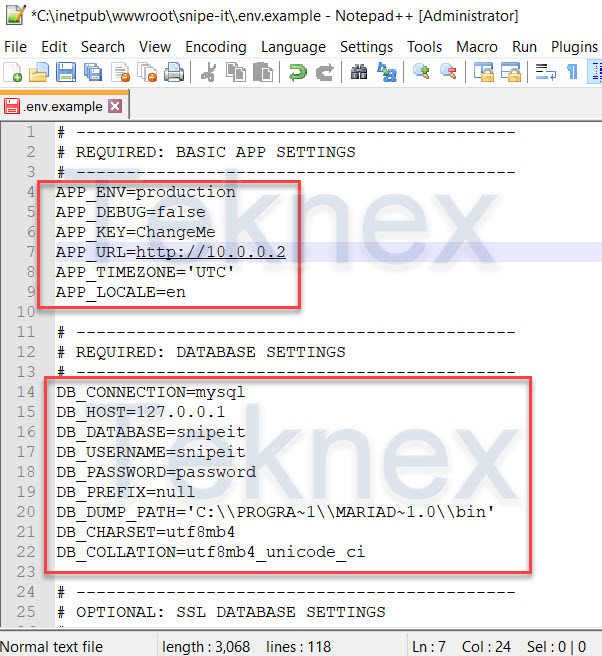
- Save that file as .env
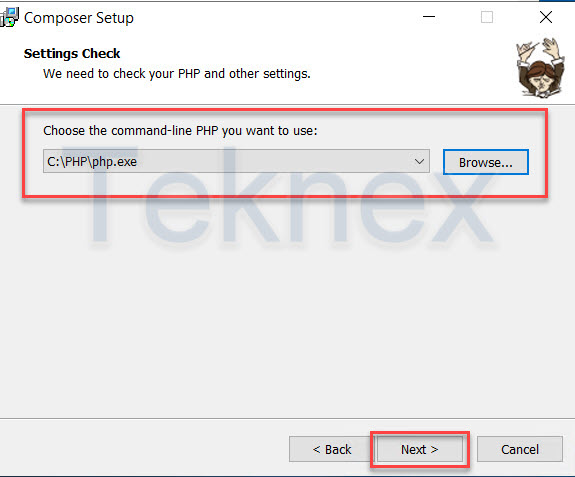
10. Install Composer
- Download Composer exe file
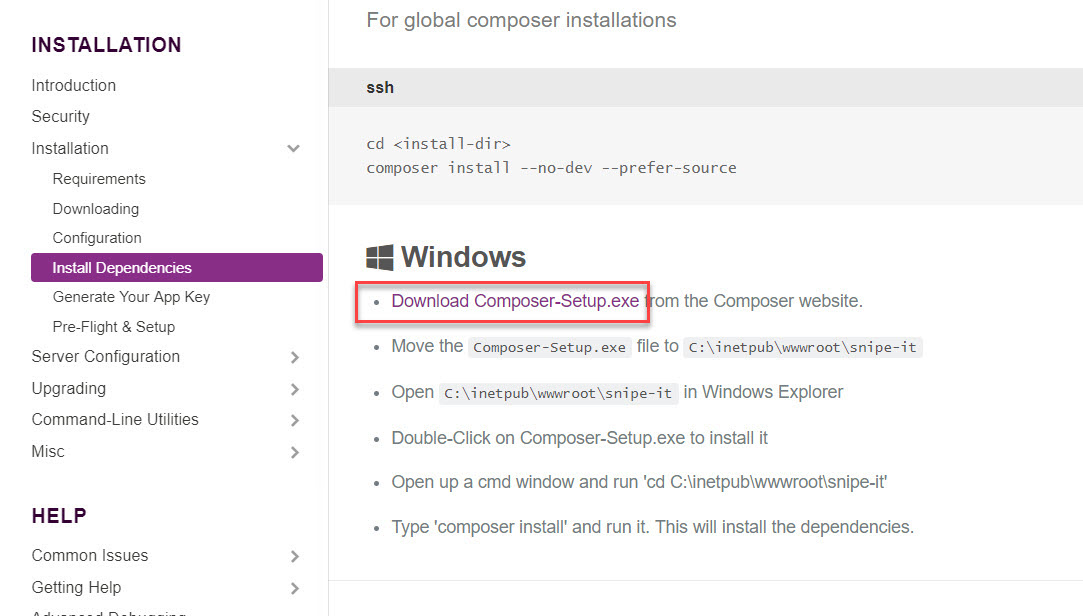
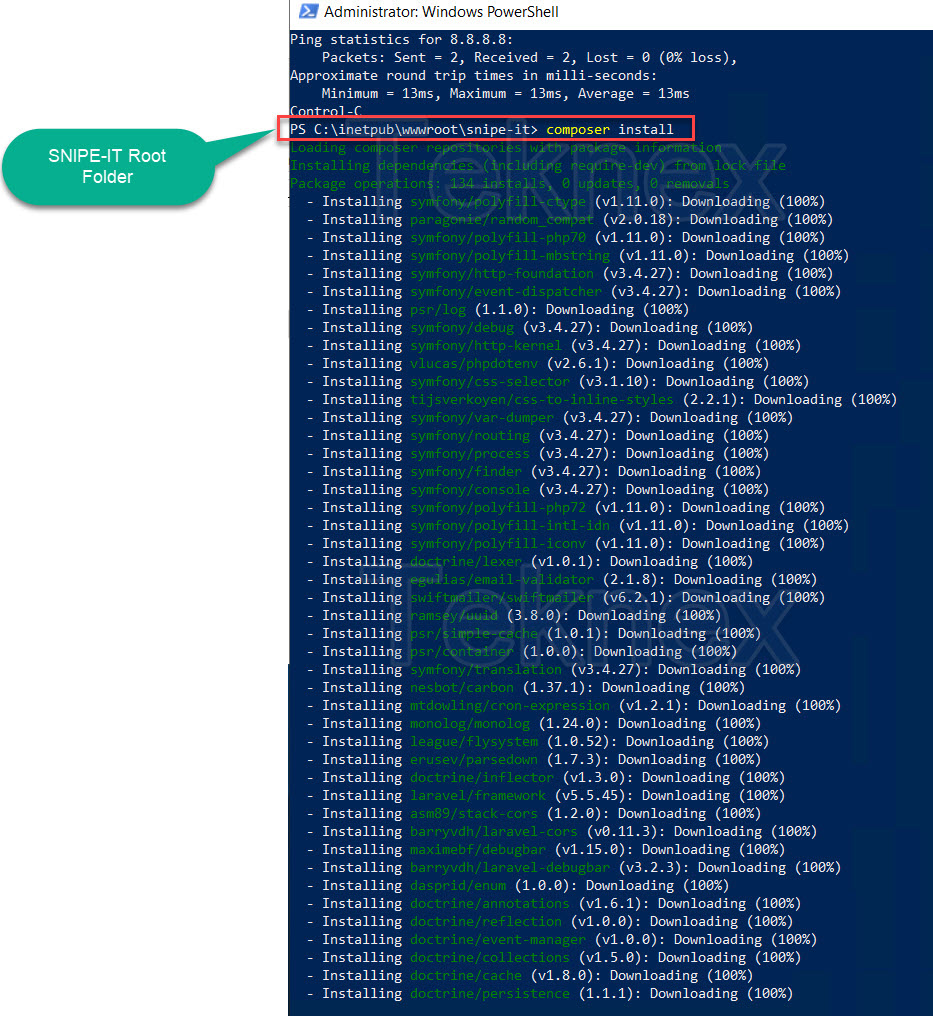
- Copy that file to Snipeit root directory, c:\intepub\wwwroot\snipeit

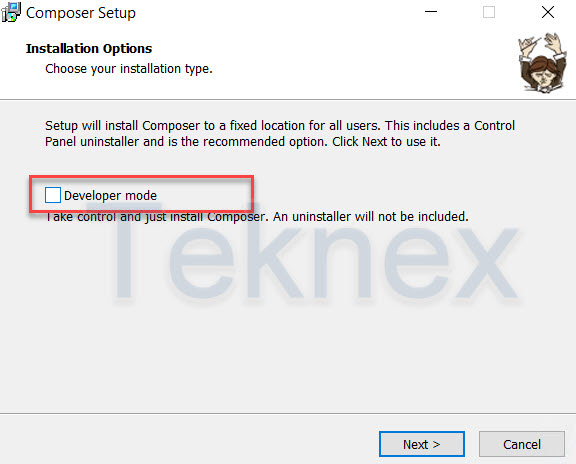
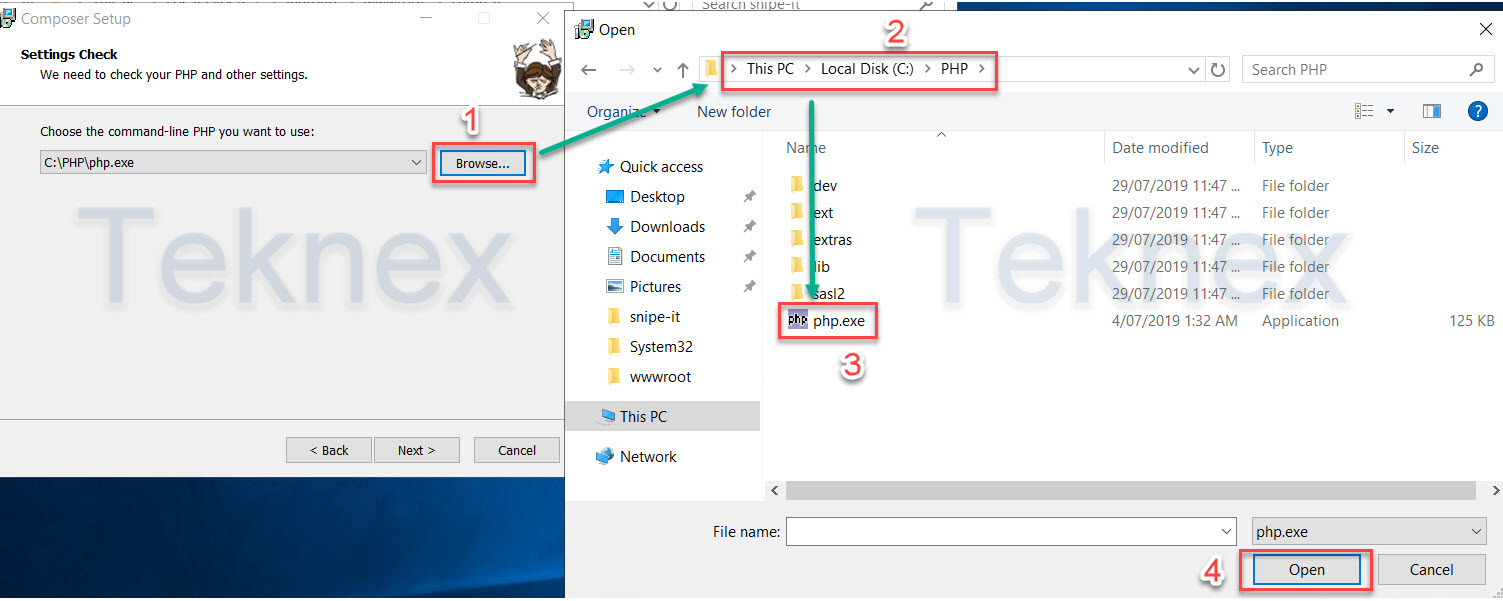
- Run Composer exe file > Leave Developer Mode unchecked > Browse to PHP root directory as discussed in step number 5 > Select PHP.exe file > Follow the prompts and finish
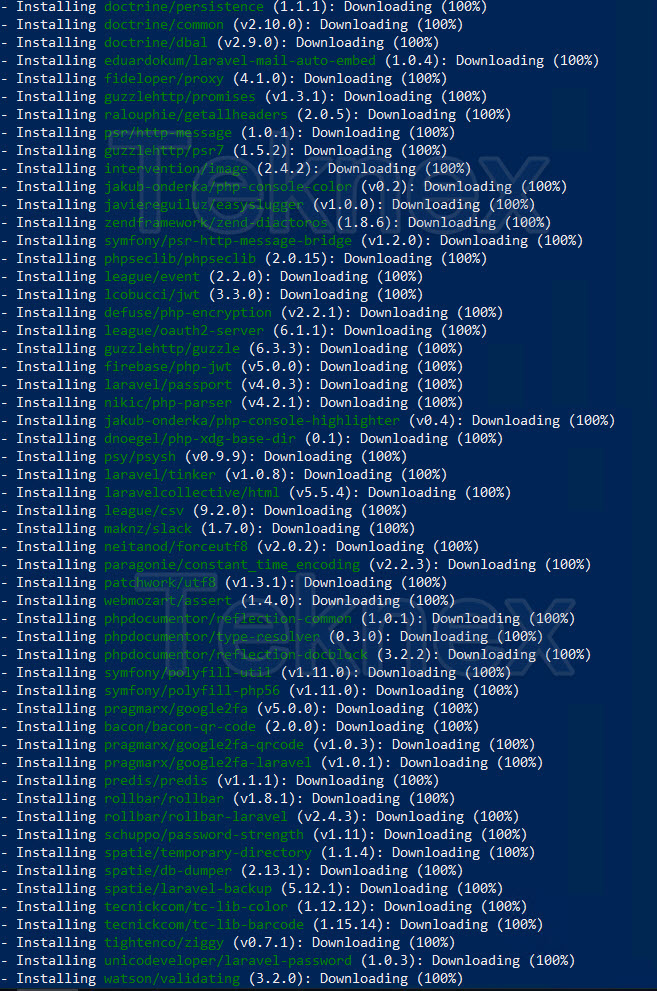
- Open Command Prompt (this might not work in PowerShell) as an administrator in the Snipe-IT root directory and run the following command (this step requires Internet connectivity, make sure you test it before hand)
composer install
11. Generate App Key
- Open command prompt as an administrator in the Snipe-IT root directory and run the following command
php artisan key:generate
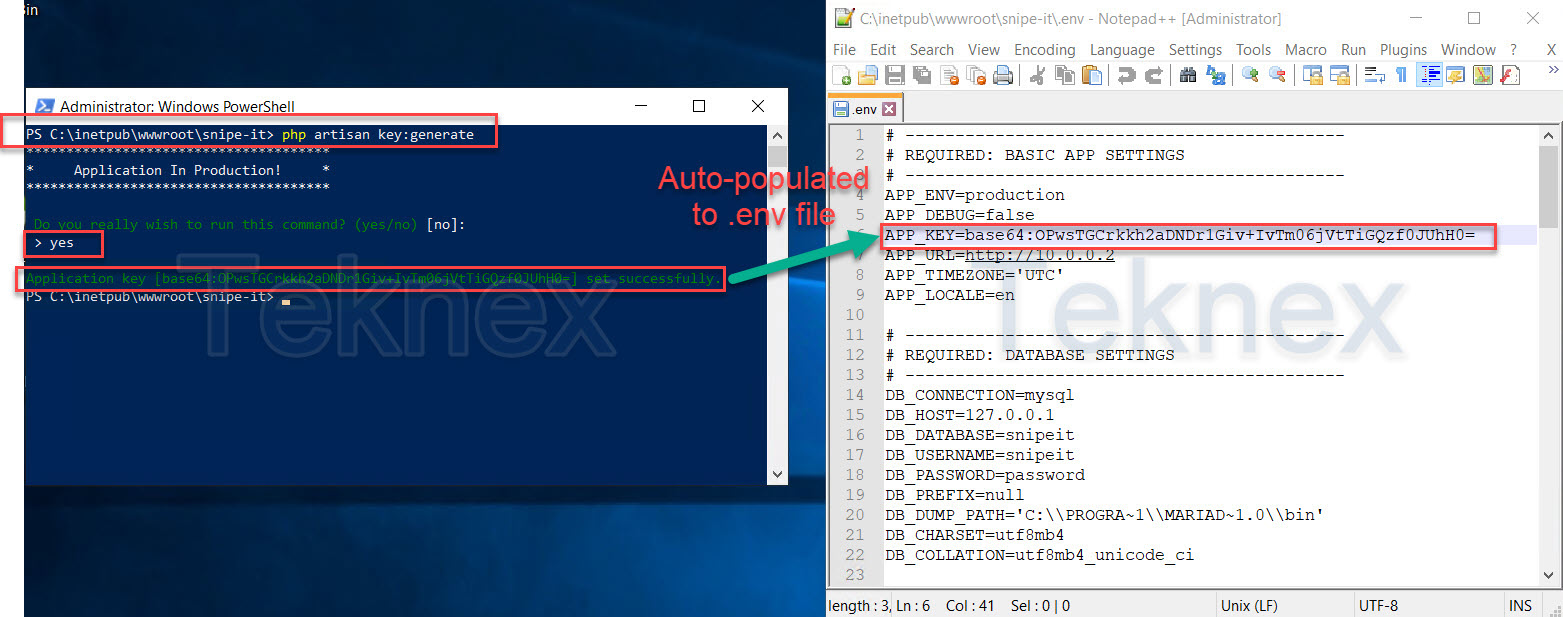
- Open .env file with Notepad++ and you would see App Key populated in the .env file automatically as shown in the above screenshot
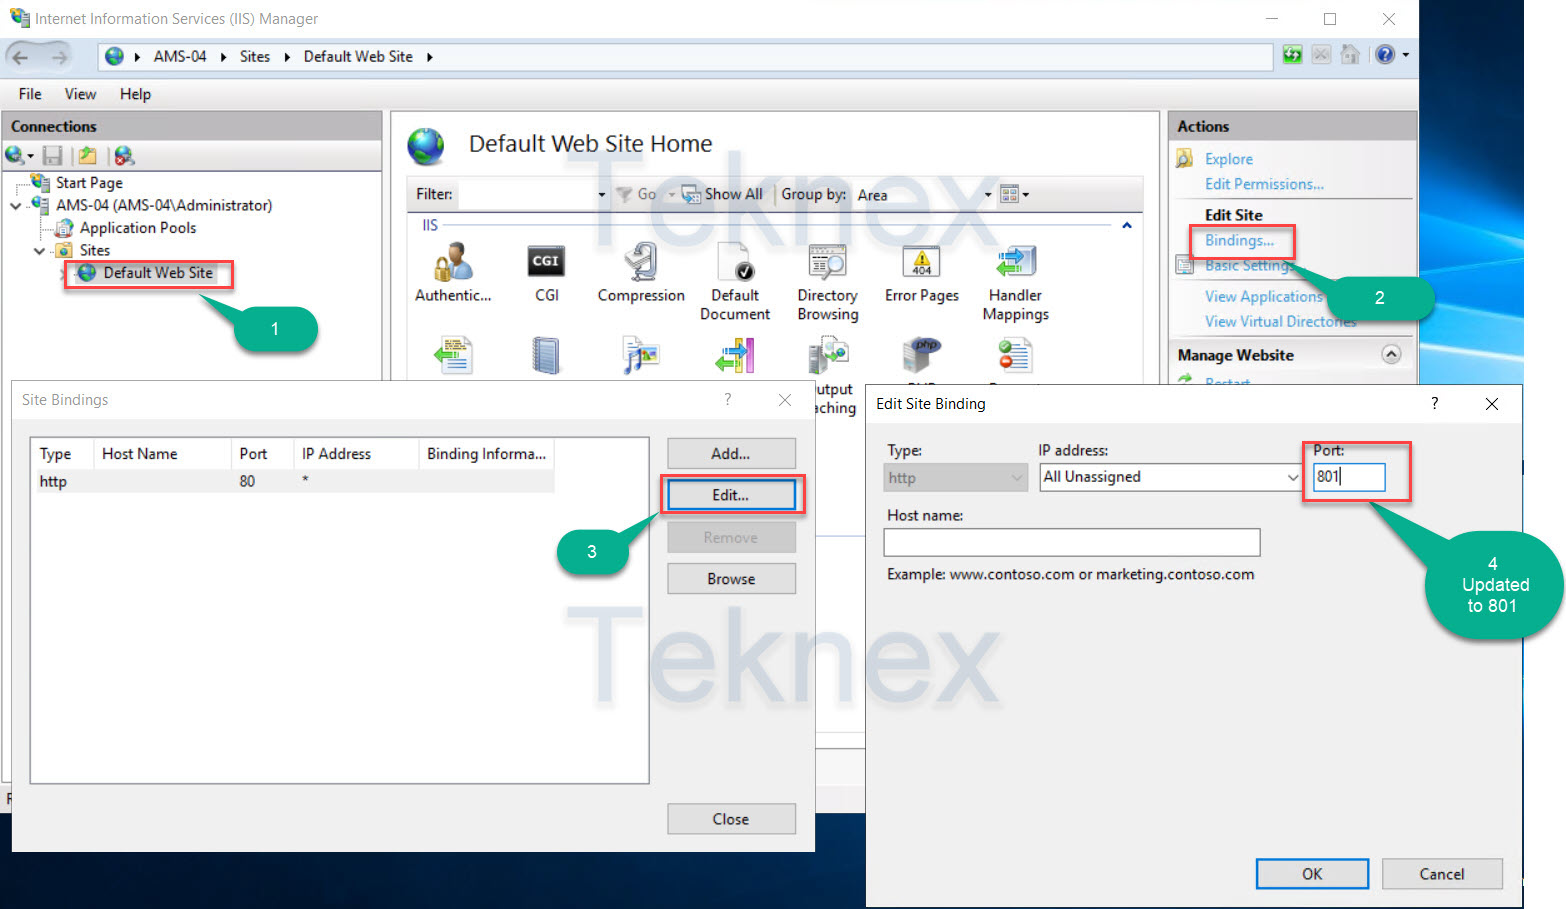
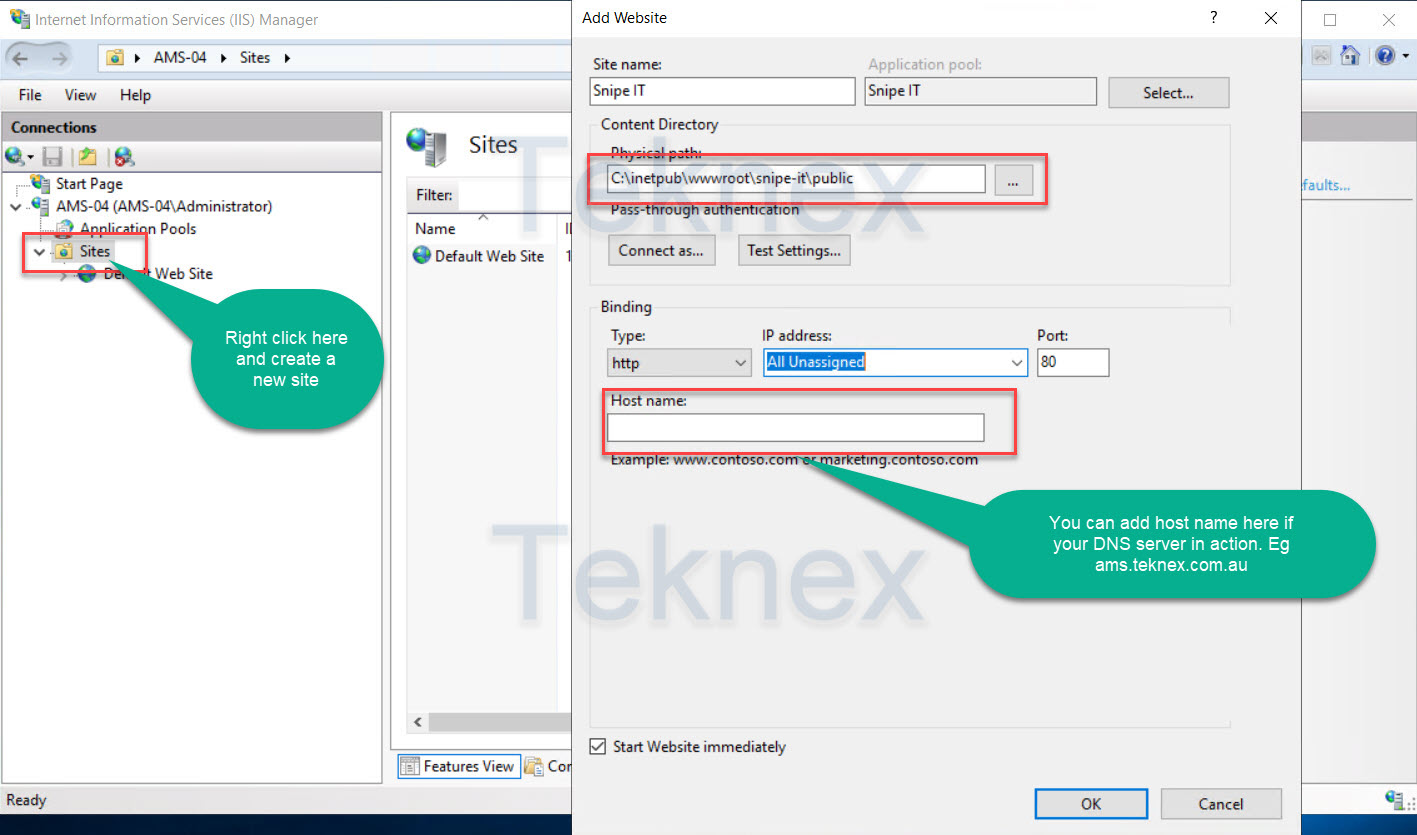
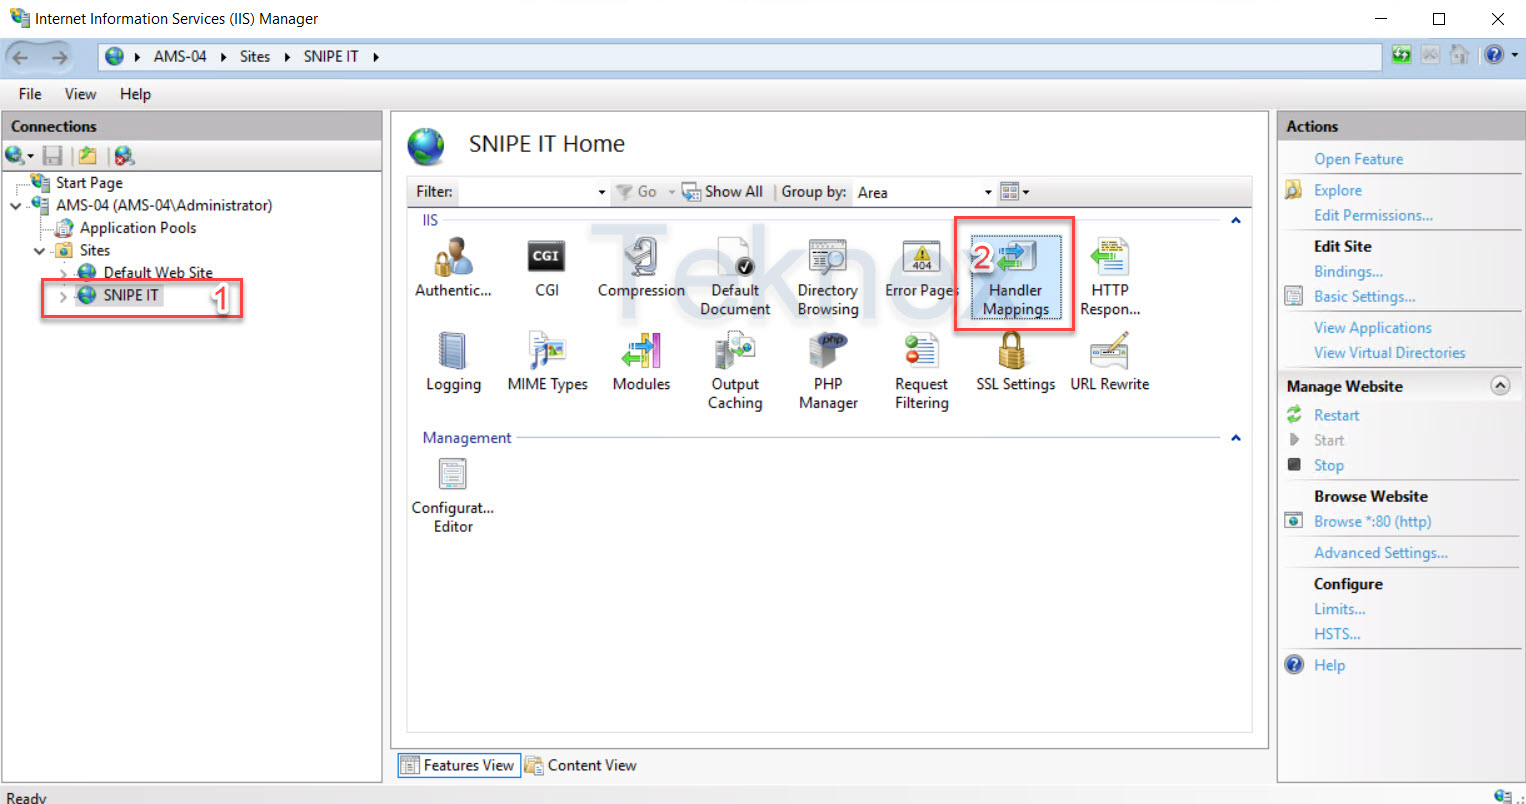
12. Create a new website
- Open IIS Manager
- Update Bindings of Default Web Site
Create new website
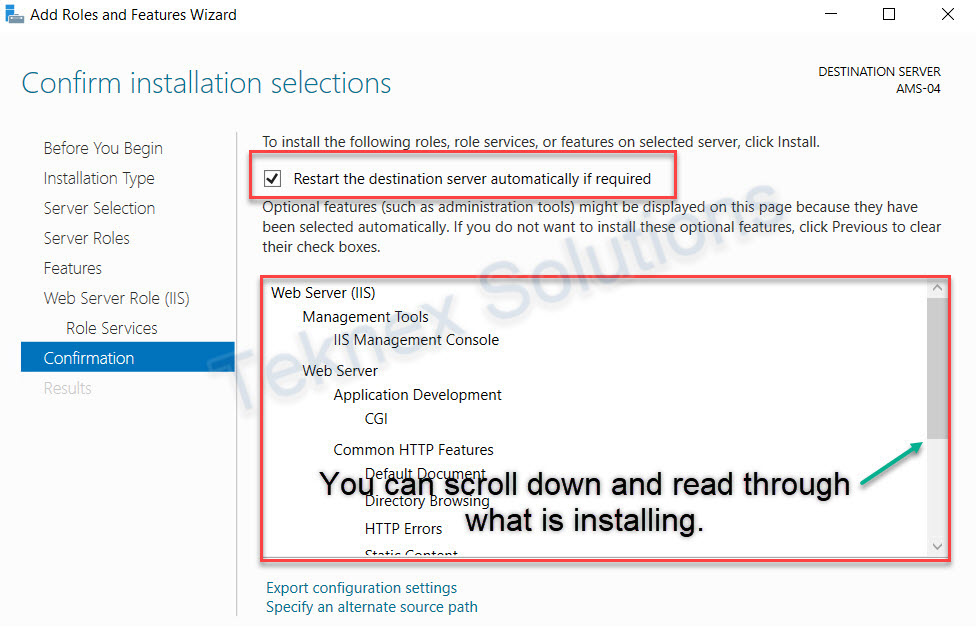
- Open IIS Server Manager and enter the details as shown in the screenshot below and click OK to start the website immediately.
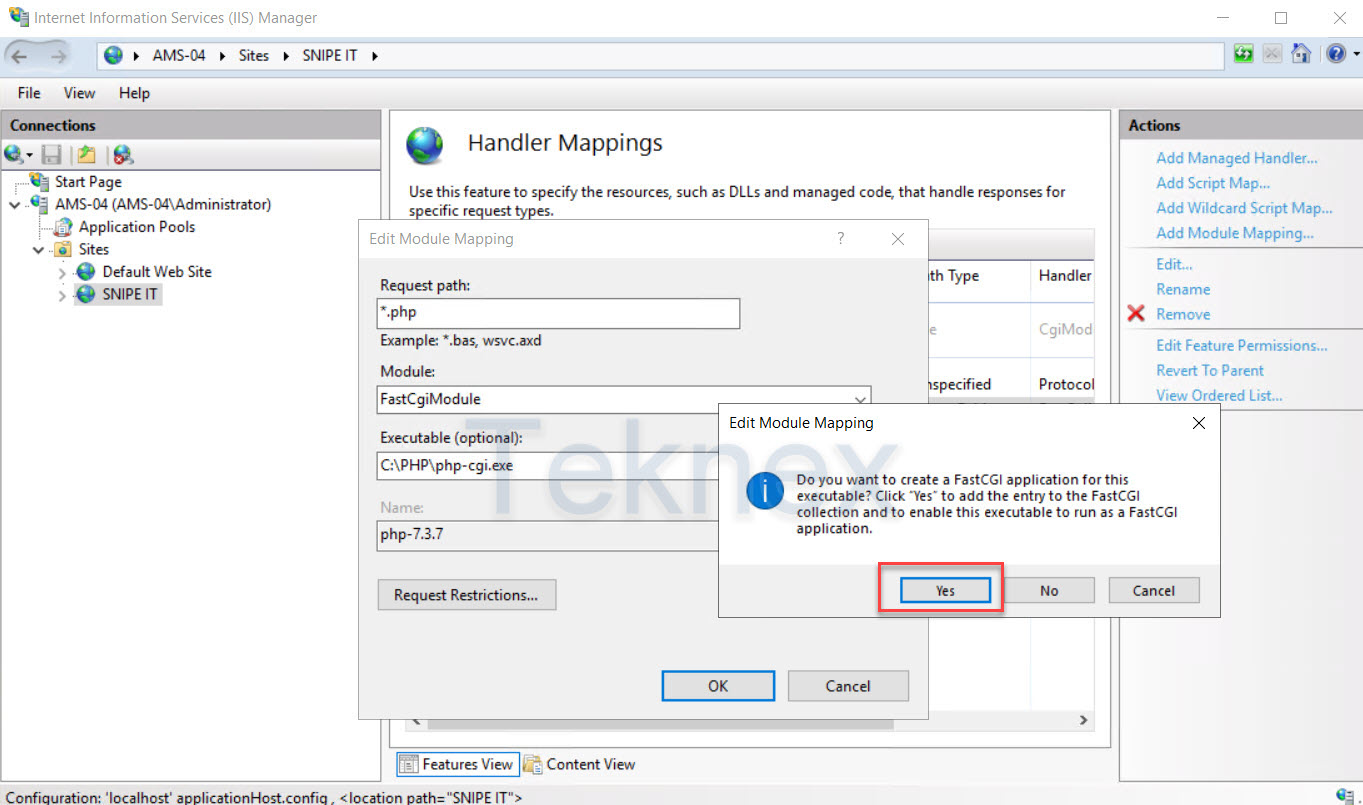
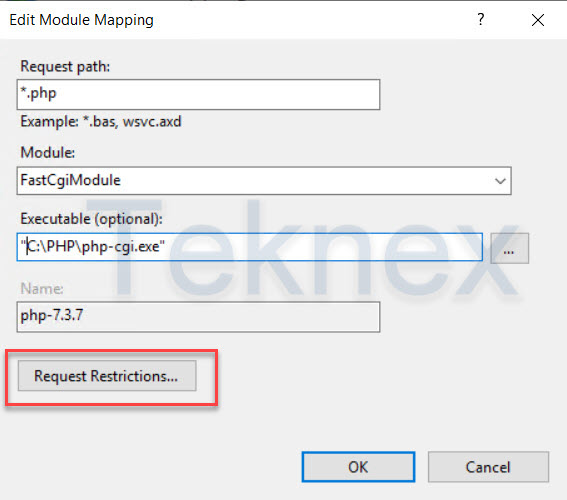
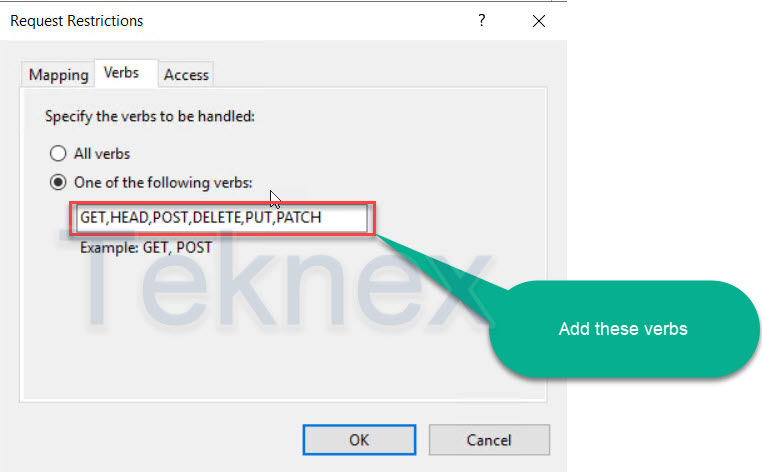
Update Handler Mappings
- In IIS Manager, click on Sites and double click on newly created site SNIPE IT
- Double Click on Handler Mappings
- Update the settings as shown in the screenshot

13. Fix Folder Permissions
Add permissions for the IIS user for the uploads folder:
- Go to C:\inetpub\wwwroot\snipe-it\public
- Right Click uploads > Properties
- Go to the Security Tab > Edit
- Click Add and change location to local machine
- Type IUSR in object name box
- Click OK
- Give IUSR full control
- Click OK twice
Add permissions for the IIS user for the cache folder:
- Go to C:\inetpub\wwwroot\snipe-it\bootstrap
- Right Click cache > Properties
- Go to the Security Tab > Edit
- Click Add and change location to local machine
- Type IUSR in object name box
- Click OK
- Give IUSR full control
- Click OK twice
Add permissions for the IIS user for the storage folder:
Go to C:\inetpub\wwwroot\snipe-it
- Right Click storage > Properties
- Go to Security Tab > Edit
- Click Add and change location to local machine
- Type IUSR in object name box
- Click OK
- Give IUSR modify permissions
- Click OK twice
Add permissions for the IIS user for the Windows Temp folder:
- Go to C:\Windows
- Right Click temp > Properties
- Go to the Security Tab > Edit
- Click Add and change location to local machine
- Type IUSR in object name box
- Click OK
- Give IUSR modify permissions
- Click OK twice
Add permissions for the IIS_IUSRS for the Windows Temp folder:
- Go to C:\Windows
- Right Click Temp > Properties
- Go to the Security Tab > Edit
- Click Add and change location to local machine
- Type IIS_IUSRS in object name box
- Click OK
- Give IIS_IUSRS modify permissions
- Click OK twice
Add permissions for the IIS_IUSRS for the Storage folder:
- Go to c:\inetpub\wwwroot\snipe-it
- Right Click Storage > Properties
- Go to the Security Tab > Edit
- Click Add and change location to local machine
- Type IIS_IUSRS in object name box
- Click OK
- Give IIS_IUSRS modify permissions
- Click OK twice
14. Browse to Snipe-IT Pre Flight Setup
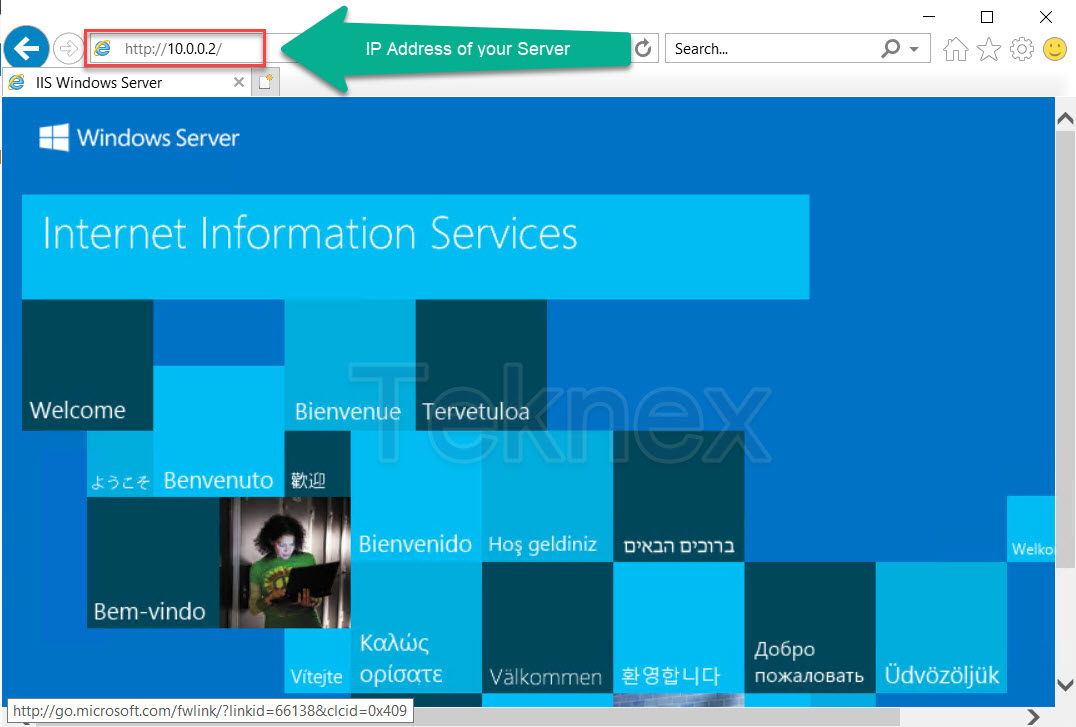
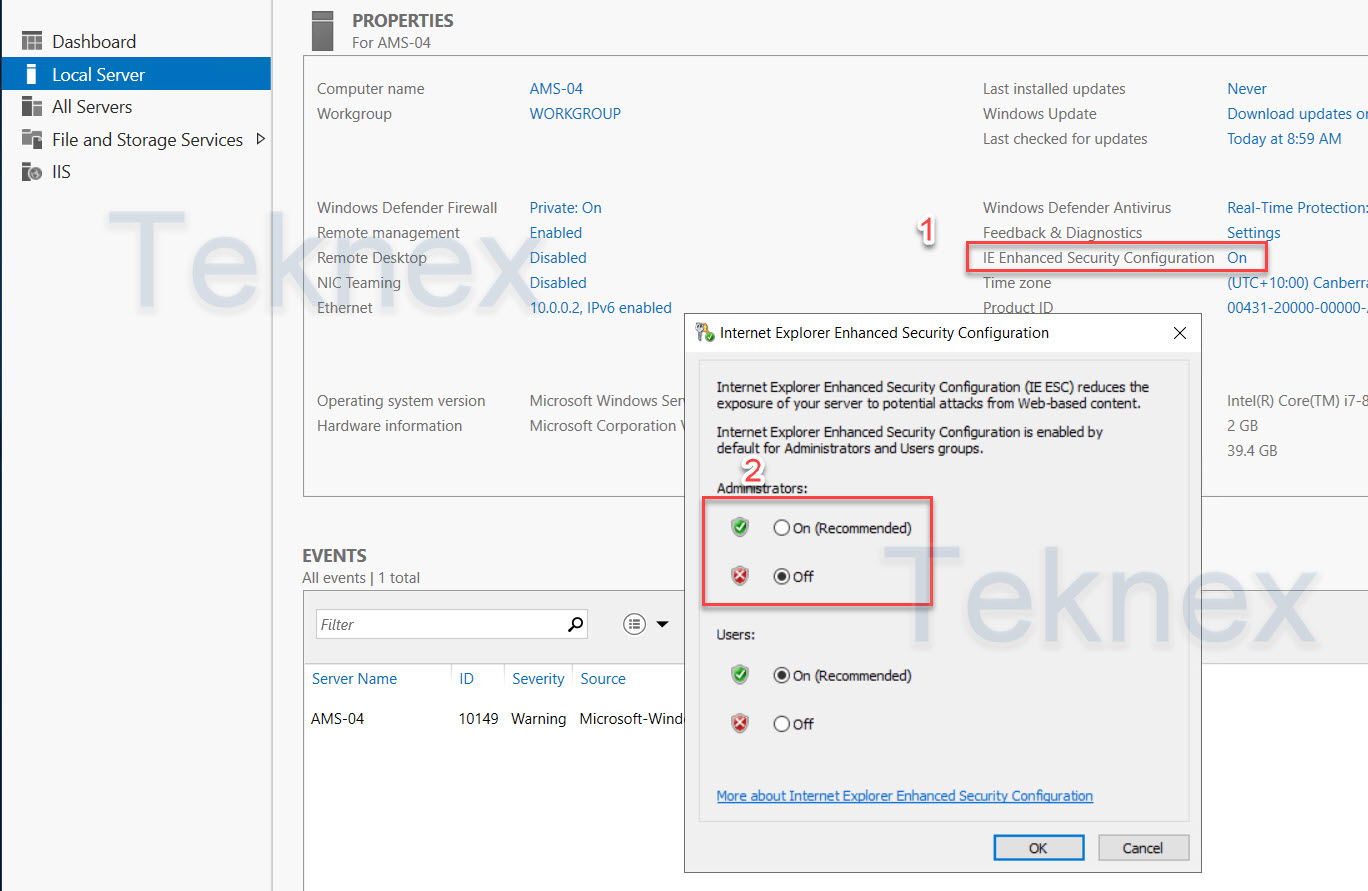
- Change security settings for IE in the Server Manager > Local Server > Enhanced Mode > Turn Off For Administrators
- Open IE and browse to your IIS Server’s IP address > In this case it is 10.0.0.2
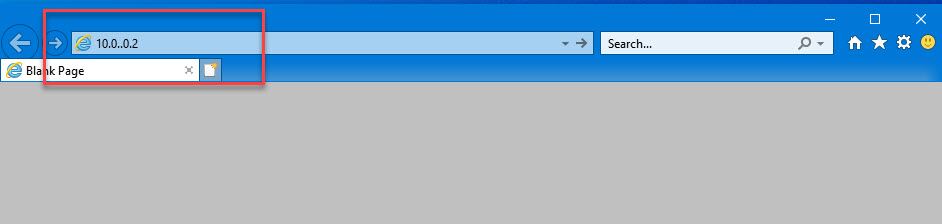
- Snipe-IT Page will load
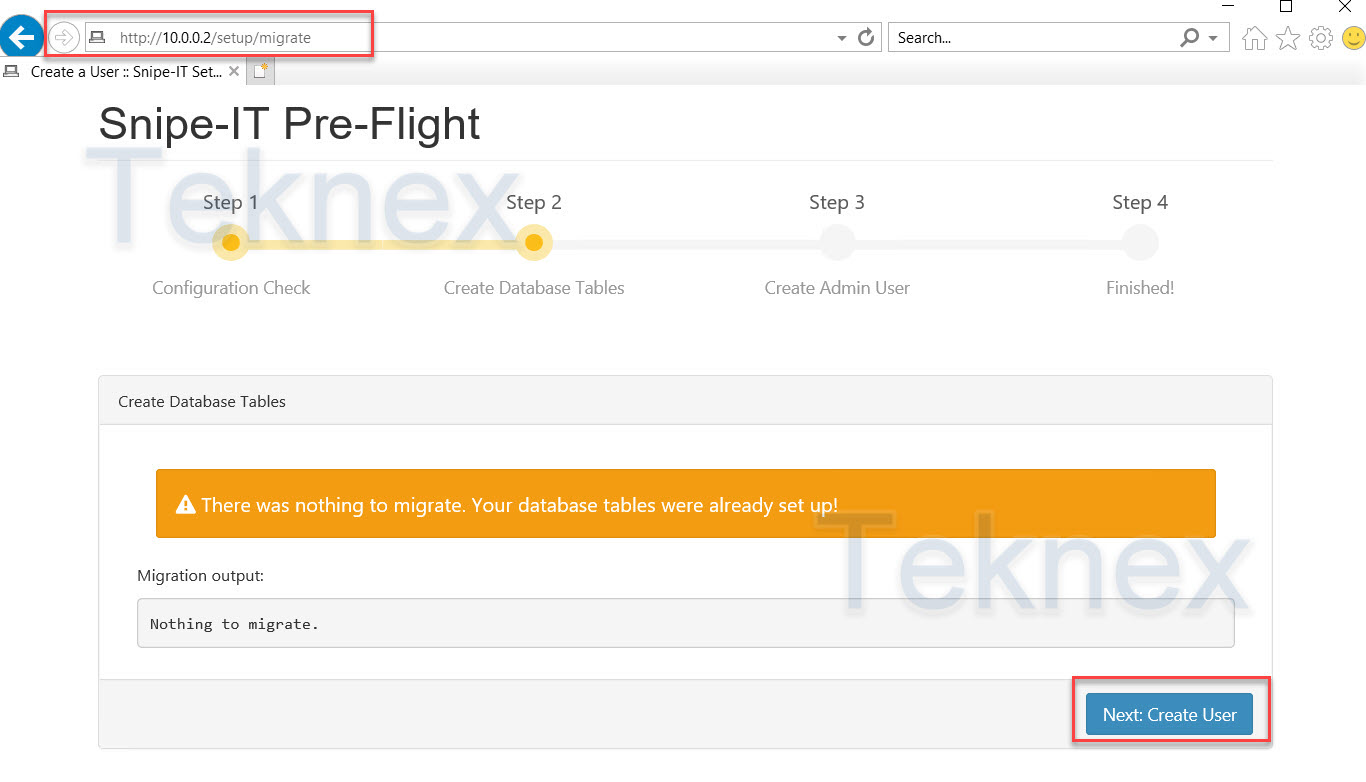
- Click Next Create Database Tables
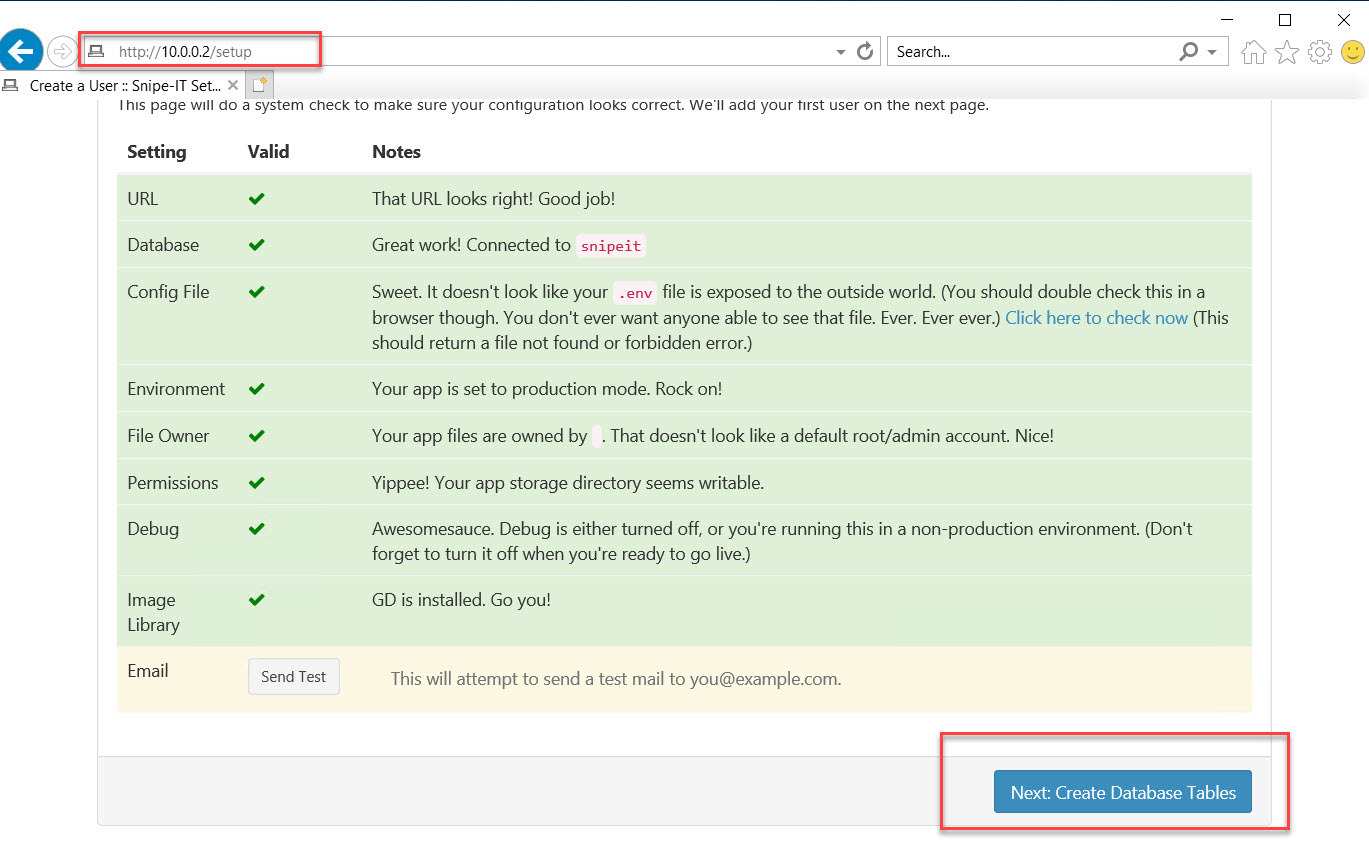
- It might show Something Went Wrong > Refresh the page

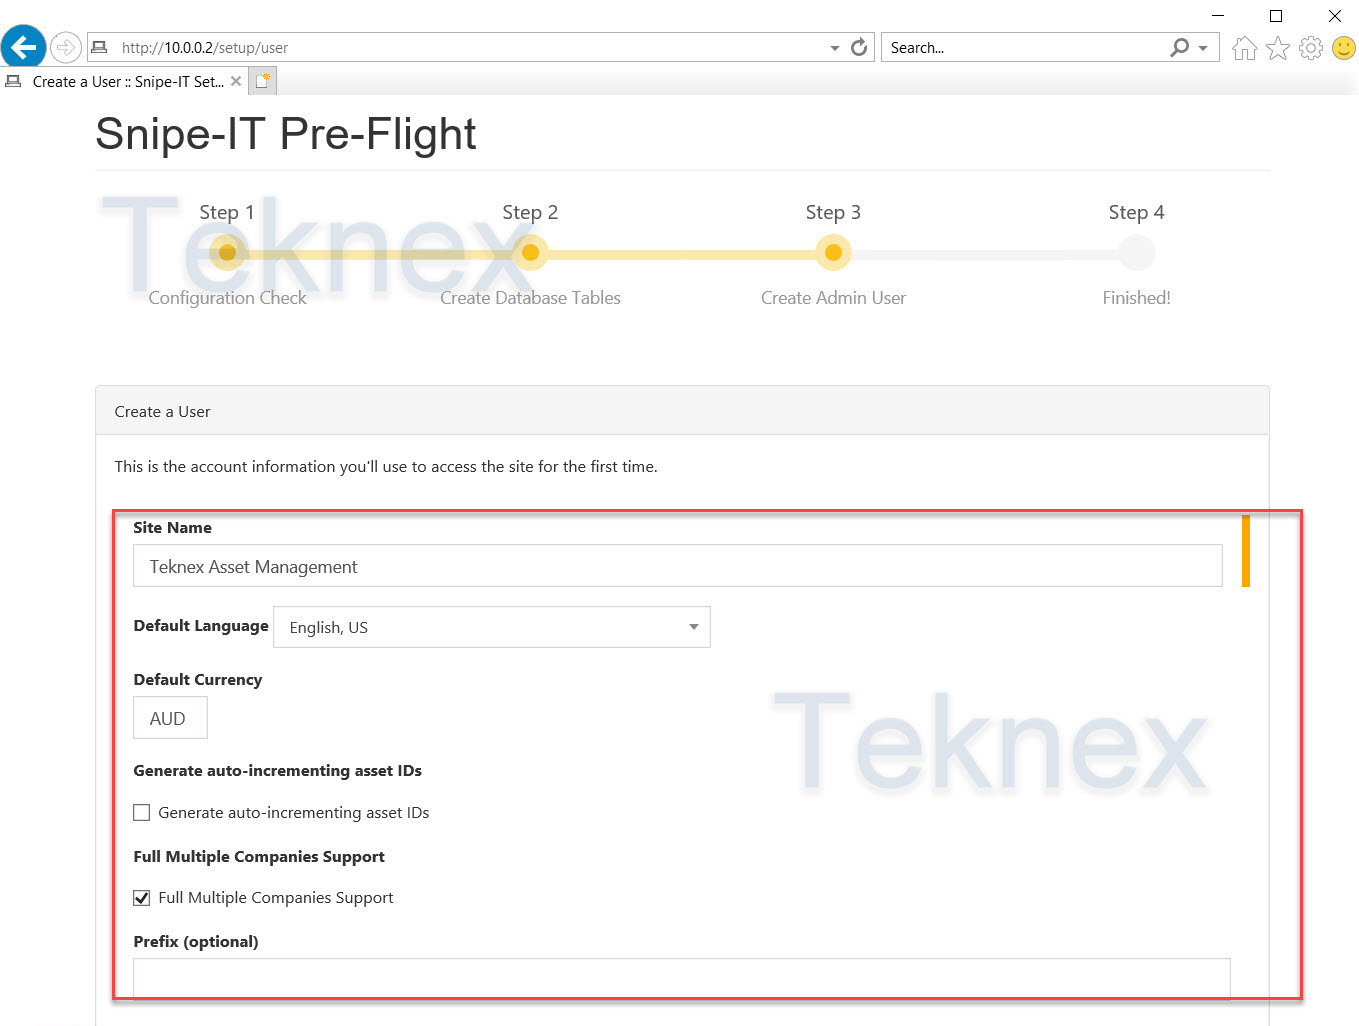
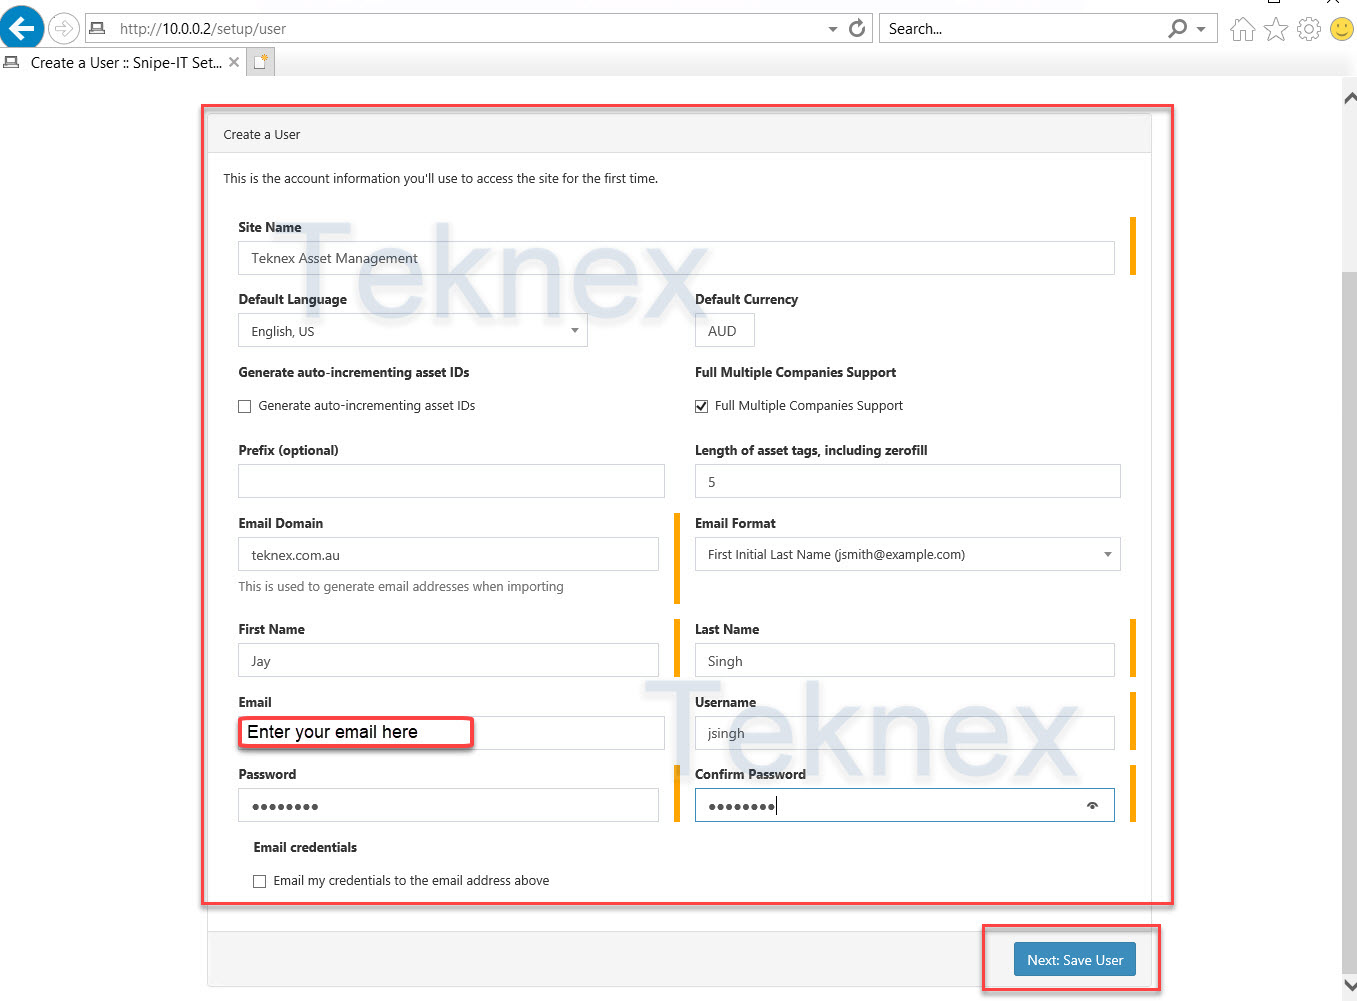
- Next: Create User > Fill all the required information > You should see the below page
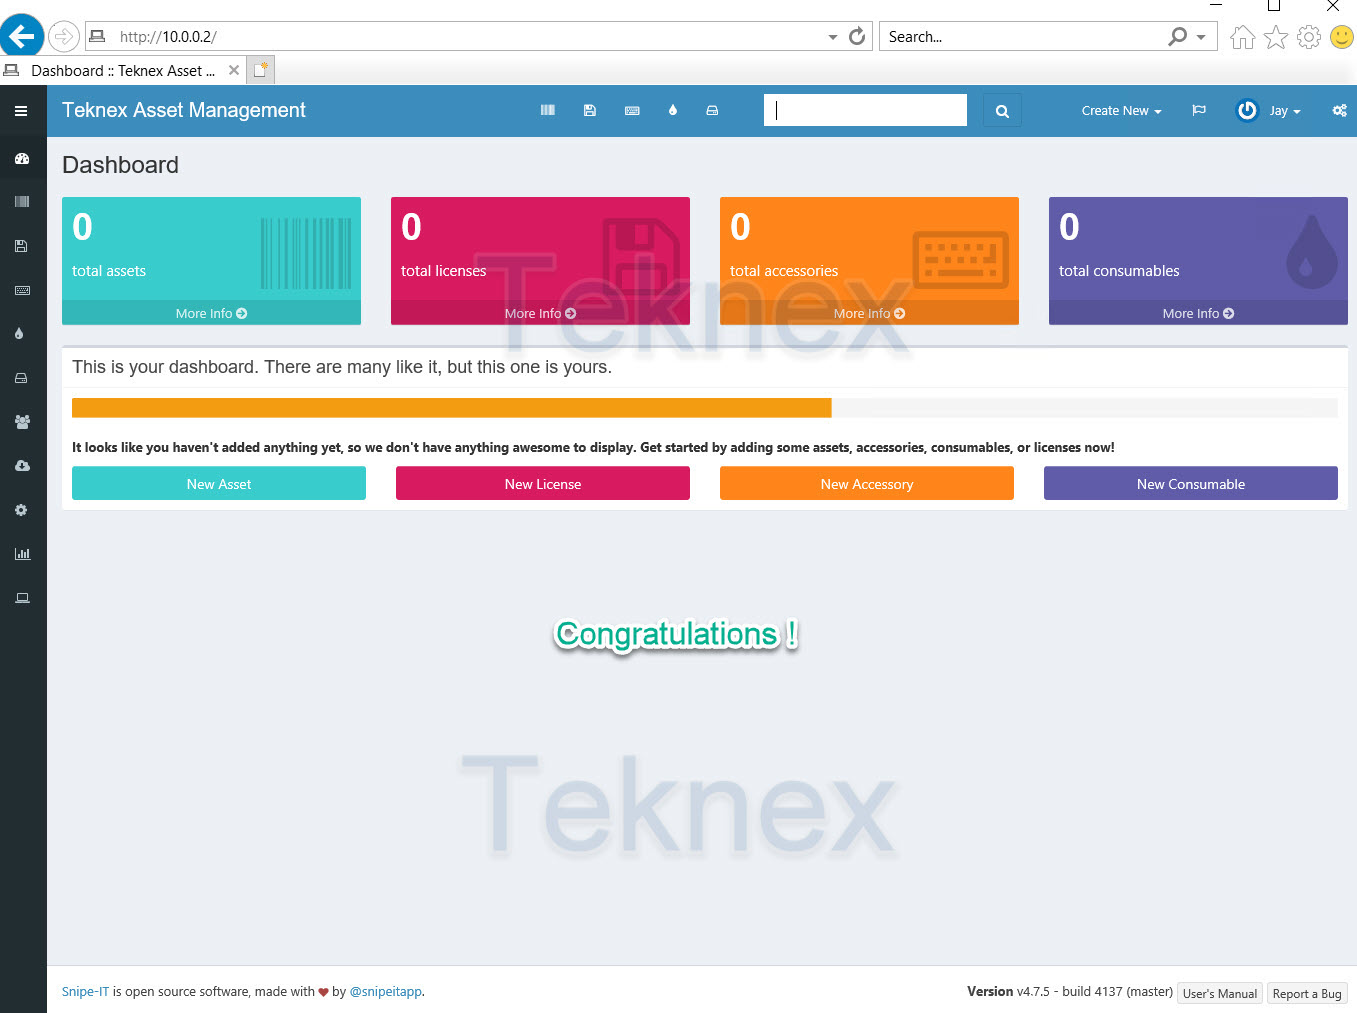
Congratulations – all done!


November 23, 2020 @ 5:23 pm
Hi..
may i know can i ignore this error?
December 6, 2020 @ 8:48 pm
Hi Saiful,
I did not see this exact warning when I installed Composer last time. That would be something like a month ago.
Have you faced any issues after the installation?
Jay
January 3, 2021 @ 10:26 pm
Thanks for the great tutorial!!! Could you please also make a tutorial how to upgrade to a newer version? (upgrading Snipe-IT, PHP version and MariaDB)
January 8, 2021 @ 9:52 am
I have the documentation ready for quite a while. I will work on this to put it out as a blog with some screenshots.
January 20, 2021 @ 9:17 am
That would be awesome if you could get that out! I followed the original to set it up, but the project sort of halted, and now I want to get it set up again with the newest version of Snipe IT, but I don’t want to start completely over if possible.
January 21, 2021 @ 8:40 am
Would be great if you had that guide! I just tried upgrading my environment, and now the website isn’t accessible….oops.
January 31, 2021 @ 11:02 am
So I got as far as installing composer in powershell. But when I go to generate a key, I get an error(see attachment). This is on Server 2016. Thank you!
January 31, 2021 @ 11:11 am
Hi Greg,
I can’t see any attachments.
Jay
January 31, 2021 @ 11:36 am
Sorry!
January 31, 2021 @ 12:25 pm
Here it is…
January 31, 2021 @ 1:11 pm
It seems like an issue on the server side. It is not posting the images for some reason. May be share the file through OneDrive or some other cloud solution.
January 31, 2021 @ 2:28 pm
PS C:\inetpub\wwwroot\snipe-it> php artisan key:generate
The environment file is invalid!
Failed to parse dotenv file due to an unexpected escape sequence. Failed at [‘C:\Program Files\MariaDB 10.0\bin’].
PS C:\inetpub\wwwroot\snipe-it> php artisan key:generate
The environment file is invalid!
Failed to parse dotenv file due to an unexpected escape sequence. Failed at [‘C:\Program Files\MariaDB 10.0\bin’].
January 31, 2021 @ 4:08 pm
What is the DB_DUMP_PATH in your .env file?
February 1, 2021 @ 12:09 am
DB_DUMP_PATH=’C:\Program Files\MariaDB 10.0\bin’
February 1, 2021 @ 2:49 am
I tried this as well:
DB_DUMP_PATH=’C:\PROGRA~1\\MARIAD~1.0\\bin’
February 1, 2021 @ 9:38 pm
Your DB_DUMP_PATH is incorrect. However, it should not impact the generation of App key. There is something else not right.
I have seen issues with PHP version 8.x.x.
I recently deployed Snipe-IT and I had no issues. I performed exactly same steps mentioned in this blog.
February 2, 2021 @ 12:07 am
So what should the dump path be? I’m running PHP 7.2.26.
February 3, 2021 @ 9:54 am
Check the blog here to update the dump path https://blog.masteringmdm.com/snipe-it-installation-on-windows-server/#9_Update_environmental_file.
Try generating the App key after fixing the dump path.
PHP version is fine.
February 3, 2021 @ 11:56 am
Do you mean save the .env file as .php?
February 3, 2021 @ 5:29 pm
I mean update the dump path as mentioned in the blog in your .env file and then save .env file after making that change. Then try generating app key.
February 4, 2021 @ 7:49 am
So this is what I get when I try to generate the key: file_get_contents(C:\inetpub\wwwroot\snipe-it\.env): failed to open stream: No such file or directory
I noticed that icon for the .env file looks like a txt file. I used Notepad++ to edit it it. Here is how the file reads:
# ——————————————–
# REQUIRED: BASIC APP SETTINGS
# ——————————————–
APP_ENV=production
APP_DEBUG=false
APP_KEY=ChangeMe
APP_URL=http://10.1.0.50
APP_TIMEZONE=’UTC’
APP_LOCALE=en
MAX_RESULTS=500
# ——————————————–
# REQUIRED: UPLOADED FILE STORAGE SETTINGS
# ——————————————–
PRIVATE_FILESYSTEM_DISK=local
PUBLIC_FILESYSTEM_DISK=local_public
# ——————————————–
# REQUIRED: DATABASE SETTINGS
# ——————————————–
DB_CONNECTION=mysql
DB_HOST=127.0.0.1
DB_DATABASE=snipeit
DB_USERNAME=snipeit
DB_PASSWORD=Greg1955
DB_PREFIX=null
DB_DUMP_PATH=’C:\PROGRA~1\MARIAD~1.0\bin’
DB_CHARSET=utf8mb4
DB_COLLATION=utf8mb4_unicode_ci
# ——————————————–
# OPTIONAL: SSL DATABASE SETTINGS
# ——————————————–
DB_SSL=false
DB_SSL_IS_PAAS=false
DB_SSL_KEY_PATH=null
DB_SSL_CERT_PATH=null
DB_SSL_CA_PATH=null
DB_SSL_CIPHER=null
# ——————————————–
# REQUIRED: OUTGOING MAIL SERVER SETTINGS
# ——————————————–
MAIL_DRIVER=smtp
MAIL_HOST=email-smtp.us-west-2.amazonaws.com
MAIL_PORT=587
MAIL_USERNAME=YOURUSERNAME
MAIL_PASSWORD=YOURPASSWORD
MAIL_ENCRYPTION=null
MAIL_FROM_ADDR=you@example.com
MAIL_FROM_NAME=’Snipe-IT’
MAIL_REPLYTO_ADDR=you@example.com
MAIL_REPLYTO_NAME=’Snipe-IT’
MAIL_AUTO_EMBED_METHOD=’attachment’
# ——————————————–
# REQUIRED: IMAGE LIBRARY
# This should be gd or imagick
# ——————————————–
IMAGE_LIB=gd
# ——————————————–
# OPTIONAL: BACKUP SETTINGS
# ——————————————–
MAIL_BACKUP_NOTIFICATION_DRIVER=null
MAIL_BACKUP_NOTIFICATION_ADDRESS=null
BACKUP_ENV=true
# ——————————————–
# OPTIONAL: SESSION SETTINGS
# ——————————————–
SESSION_LIFETIME=12000
EXPIRE_ON_CLOSE=false
ENCRYPT=false
COOKIE_NAME=snipeit_session
COOKIE_DOMAIN=null
SECURE_COOKIES=false
API_TOKEN_EXPIRATION_YEARS=40
# ——————————————–
# OPTIONAL: SECURITY HEADER SETTINGS
# ——————————————–
APP_TRUSTED_PROXIES=192.168.1.1,10.0.0.1
ALLOW_IFRAMING=false
REFERRER_POLICY=same-origin
ENABLE_CSP=false
CORS_ALLOWED_ORIGINS=null
ENABLE_HSTS=false
# ——————————————–
# OPTIONAL: CACHE SETTINGS
# ——————————————–
CACHE_DRIVER=file
SESSION_DRIVER=file
QUEUE_DRIVER=sync
CACHE_PREFIX=snipeit
# ——————————————–
# OPTIONAL: REDIS SETTINGS
# ——————————————–
REDIS_HOST=null
REDIS_PASSWORD=null
REDIS_PORT=null
# ——————————————–
# OPTIONAL: MEMCACHED SETTINGS
# ——————————————–
MEMCACHED_HOST=null
MEMCACHED_PORT=null
# ——————————————–
# OPTIONAL: PUBLIC S3 Settings
# ——————————————–
PUBLIC_AWS_SECRET_ACCESS_KEY=null
PUBLIC_AWS_ACCESS_KEY_ID=null
PUBLIC_AWS_DEFAULT_REGION=null
PUBLIC_AWS_BUCKET=null
PUBLIC_AWS_URL=null
PUBLIC_AWS_BUCKET_ROOT=null
# ——————————————–
# OPTIONAL: PRIVATE S3 Settings
# ——————————————–
PRIVATE_AWS_ACCESS_KEY_ID=null
PRIVATE_AWS_SECRET_ACCESS_KEY=null
PRIVATE_AWS_DEFAULT_REGION=null
PRIVATE_AWS_BUCKET=null
PRIVATE_AWS_URL=null
PRIVATE_AWS_BUCKET_ROOT=null
# ——————————————–
# OPTIONAL: LOGIN THROTTLING
# ——————————————–
LOGIN_MAX_ATTEMPTS=5
LOGIN_LOCKOUT_DURATION=60
RESET_PASSWORD_LINK_EXPIRES=900
# ——————————————–
# OPTIONAL: MISC
# ——————————————–
APP_LOG=single
APP_LOG_MAX_FILES=10
APP_LOCKED=false
APP_CIPHER=AES-256-CBC
GOOGLE_MAPS_API=
LDAP_MEM_LIM=500M
LDAP_TIME_LIM=600
I really appreciate your help with this! Greg
February 5, 2021 @ 7:07 am
I think you found the problem.
Open File Explorer > Select View in the tool bar > Check the box “File name extensions”.
In the c:\inetpub\wwwroot\snipe-it folder, you will see .env file has something at the end. May be it will look like “.env.txt”. Ensure “.env” file does not have any extension. It supposed to be just “.env” file. This is the reason why we used Notepad++ at the first place, because by default Windows does not allow to save any file without any name. Technically, “.env” file has no name but an extension as it ends with “.env” at the end.
Jay
February 8, 2021 @ 9:23 am
Hi Jay,
I’m at the Pre-Flight Setup. When I go to http://10.1.0.50/setup, I get ‘Not Found’ error. When I go to snipe-it.mydomain.org, I get a Plesk Default Page. If I add /setup to it, I get a similar error that references Apache. What am I missing here?
February 15, 2021 @ 1:10 pm
Hi Jay, thank you for the guide, i followed your instructions but my pre-flight page setup is completely blank, could you please help with this?
February 16, 2021 @ 3:04 pm
Turn on the debug mode from the .env file. It might display the error.
Here is how you can enable debug mode:
Open your .env. file and change APP_DEBUG=false to APP_DEBUG=true
February 24, 2021 @ 11:08 pm
Hi Jay ,
Thank you for the great instructions, but I have problem. When I go to generate a key, I get an error (in CMD):
C:\>cd C:\inetpub\wwwroot\snipe-it
C:\inetpub\wwwroot\snipe-it>php artisan key:generate
The environment file is invalid!
Failed to parse dotenv file due to an unexpected escape sequence. Failed at [‘C:\PROGRA~1\MARIAD~1.0\bin’].
C:\inetpub\wwwroot\snipe-it>
OS:Windows server 2019
PHP version :7.3.27 but I tried 8.0.2 or 7.2.0
In .env file I tried DB_DUMP_PATH:’C:\Program Files\MariaDB 10.0\bin’ and DB_DUMP_PATH=’C:\PROGRA~1\MARIAD~1.0\bin’ but problem is same
File .env isn´t in txt format.
February 25, 2021 @ 12:08 am
Hi Jay, I have problem when generate a key
Error:
C:\>cd C:\inetpub\wwwroot\snipe-it
C:\inetpub\wwwroot\snipe-it>php artisan key:generate
The environment file is invalid!
Failed to parse dotenv file due to an unexpected escape sequence. Failed at [‘C:\PROGRA~1\MARIAD~1.0\bin’].
C:\inetpub\wwwroot\snipe-it>
I tried to edit DB_DUMP_PATH in .env file (DB_DUMP_PATH=’C:\Program Files\MariaDB 10.0\bin’) but error is same :
C:\inetpub\wwwroot\snipe-it>php artisan key:generate
The environment file is invalid!
Failed to parse dotenv file due to an unexpected escape sequence. Failed at [‘C:\Program Files\MariaDB 10.0\bin’].
C:\inetpub\wwwroot\snipe-it>
OS:Win Server2019
PHP version : 7.3.27 but i tried 8.0.2 and 7.2.0 – same problem
.env file isn’t in txt format .
February 26, 2021 @ 8:19 am
Seems like something else is not right in the .env file then. Replace your .env with the original file and then make the require amendments.
February 27, 2021 @ 2:36 am
Worked Perfectly!!!
March 5, 2021 @ 1:34 am
THANK YOU FOR GUIDE!!!
It’s really straightforward 🙂
the only issue I had was when I was trying the command “compose install” on powershell and I was getting an error message. But when using cmd it worked
March 7, 2021 @ 5:43 pm
You are welcome and I appreciate your feedback. I made it clearer not to run in PowerShell.
Cheers!
Jay
April 18, 2021 @ 6:07 am
Interesting. I couldn’t get it to work in cmd but it ran fine in PowerShell.
March 24, 2021 @ 5:32 pm
For anyone having dump path issues, the fix for me was to use the picture, not copy/paste text – the text shows a single slash in the path, the image shows double slashes – double works, single doesn’t!
It’s mentioned in the guide, but is easy to miss if you follow the guide and just copy/paste your own path!
March 25, 2021 @ 8:05 am
I still see the double slashes in the text. Also, there is a special comment in the brackets pointing out double slashes.
March 29, 2021 @ 10:06 pm
this is wonderful, first time i have got this running properly on Windows and i have tried lots of times in the past.
April 19, 2021 @ 2:14 am
I got this setup and working perfectly with 5.1.4. Do you have a how to guide on how to migrate? I am running 4.9.2 on a ubuntu server and want to migrate it over to this windows VM. Also want to upgrade it to the newest version when I migrate.
April 20, 2021 @ 7:42 pm
Hi Todd,
I have tested the migration only on Windows and made some notes. I will try to share the migration notes I have.
April 30, 2021 @ 11:17 am
Thanks Jay. What about upgrading? I tried running the command that snipe recommends, php upgrade.php but no luck. Have you been able to upgrade?
May 2, 2021 @ 2:14 am
Good morning!
I recently had to rebuild my server(server 2019) that contained SnipeIT(5.0.12). I have the program re-installed and need to import a backup. I have unzipped the backup file and placed it in /storage/app/backups. I then tried a couple of suggestions from Github(see attachment). Do I need to put it in a different directory? Do you happen to know if they are working on a one-click restore feature? Thank you for your time!
Greg
May 6, 2021 @ 2:50 pm
I tested upgrade on the same server though. This is the process I followed:
• rename original snipeit folder to snipeit-old
• create new folder snipeit
• download up-to-date snipe-it files and put in c:\inetpub\www\snipeit
• copy over the old .env and your OAuth keys from c:\inetpub\www\snipeit-old to c:\inetpub\www\snipeit
• copy over any files or folders from c:\inetpub\www\snipeit-old\public\uploads to c:\inetpub\www\snipeit\public\uploads
• copy over any files or folders from c:\inetpub\www\snipeit-old\storage\private_uploads to c:\inetpub\www\snipeit\storage\private_uploads
• run the following from SNIPE-IT root directory in PowerShell/CMD
– composer install –no-dev –prefer-source
– composer dump-autoload
– php artisan migrate
– php artisan config:clear
– php artisan config:cache
December 10, 2021 @ 12:13 am
this unfortunately seems to have killed my Snipe setup (5.1.3>5.3.3), i get 500 Server Error now. I will reinstall from scratch.
December 10, 2021 @ 12:48 pm
This guide killed your setup. Strange!!
December 11, 2021 @ 12:41 am
no worries, it was only a test environment 🙂 i reinstalled with mariadb-10.6.5-winx64 since the version listed here is no longer available, and it worked but i then got errors trying to make a backup – another forum elsewhere suggested that version of MariaDB was too new.. ?
December 11, 2021 @ 1:46 pm
SNIPE-IT team has removed the version number of the database in the listed requirements here https://snipe-it.readme.io/docs/requirements. I have not deployed SNIPE-IT in a while and for sure I will check it, and update the blog accordingly.
December 13, 2021 @ 7:31 pm
looks like MariaDb 10.1.14 is still recommended, PHP is now 7.4 > 8 so i assume mine (7.4.26) is ok?
December 11, 2021 @ 1:02 am
tried mariadb-10.2.41-winx64 (oldest version available, closest to 10.1.14 and it fails at “php artisan key:generate”, it doesnt produce an error but doesnt update the .env file either. Pretty sure i have the right path for MariaDB
December 16, 2021 @ 8:39 pm
tricky (and quite fun) to play with this, it seems you need the right combination of Snipe, Maria DB and PHP to get this working. (Saw on another forum that a lot of people were having issues with PHP 7.4 and these artisan commands for instance).
May 30, 2021 @ 9:43 am
Had a NIGHTMARE of a time completing Step 10 Install composer. It kept kicking back an error that php_gd2.dll could not be found. I finally realized the solution was to go into the php.ini file and edit the [PHP_GD2] extension=php_gd2.dll to php_gd.dll.
This is because in PHP 8, gd2 was replaced with gd. this matches linux, etc.
May 30, 2021 @ 9:44 am
Oh and DEFINITELY install Notepad ++ do not use notepad built into windows
June 23, 2021 @ 7:26 pm
Hi…
I am getting below error while composer installation…
Please suggest…
June 24, 2021 @ 8:40 am
What PHP version are you using?
July 26, 2021 @ 10:54 pm
Sry no Pics any more in the tutorail ;(
August 7, 2021 @ 7:35 pm
Those photos were hosted on a different hosting which I cancelled and without realizing this would stuff this up.
Luckily had those screenshots saved!
July 28, 2021 @ 9:13 pm
Hi
Seems like all the images for this guide no longer work.
August 7, 2021 @ 7:35 pm
Those photos were hosted on a different hosting which I cancelled without realizing this would stuff this up.
Luckily had those screenshots saved!
August 2, 2021 @ 6:37 pm
Hi Images is not displaying
August 7, 2021 @ 7:35 pm
Those photos were hosted on a different hosting which I cancelled without realizing this would stuff this up.
Luckily had those screenshots saved!
August 18, 2021 @ 7:10 pm
Hi, img do not show, How to solve it ?.
Thanks so much.
August 20, 2021 @ 9:28 am
They all are fine, this was fixed more than a week ago. In case you don’t see, you might have to clear your browser cache.
August 18, 2021 @ 7:13 pm
Hi, Images do not show, How to solve it ?.
Thanks so much.
September 26, 2021 @ 6:50 pm
hi im unable to connect or view the page, please help
September 26, 2021 @ 6:54 pm
Turn on the debug mode from the .env file. It might display the error.
Here is how you can enable debug mode:
Open your .env. file and change APP_DEBUG=false to APP_DEBUG=true
January 7, 2022 @ 6:00 am
January 11, 2022 @ 12:30 pm
getting this error when doing the key generate
January 11, 2022 @ 8:37 pm
Share your PHP, MySQL, and other configurations.
February 17, 2022 @ 5:53 am
I’m getting the same thing PHP 8.1.3 maria db 10.0.14 snipeit 5.3.10
March 14, 2022 @ 5:41 pm
Getting the same error
PHP 8.1.3
MariaDB 10.0.14
Snipeit 5.4.1
March 14, 2022 @ 5:58 pm
EDIT : Fixed the error by removing PHP 8.1.3 and installing PHP 7.4.28
January 27, 2022 @ 7:44 pm
Thank you for videos and blogs, It’s so much informative and quick start for a new commer. I would like to know if you would have explore the feature of requetable asset from users, The ideas is that i will import the user from AD and they have access on SnipeIT.
I would like to give them permission to request an asset ? How can i do this ?
Ajay
March 17, 2022 @ 2:28 am
Great tutorial! It really helps with the set up process.
I am running into an issue with the Snipe-It set up. I get to the initial setup screen and everything looks good. When I click on “Next: Create Database Tables” I get a “500 | Server Error”. If I skip it and go on to the user setup it gives the same error when I try to save it.
Any thoughts? Everything else up to this point has worked without issue.
August 24, 2022 @ 1:42 am
Hey Jay,
Great tutorial! I only had a couple of hiccups most of which I was able to solve. but I am running into one small issue I cannot solve. I am getting the following error: “HTTP Error 404.0 – Not Found” and when I browse the path it is looking for “C:\inetpub\wwwroot\snipe-it\public\setup” there is no setup file there. what is the best way to remedy this?
August 27, 2022 @ 12:21 am
It is to bad I can’t get this working. I would have loved to use it but it just doesn’t work no matter what I do. I keep getting a 404 error no matter where I point it and can’t get anyone to help me figure out where to point it. I ran it step by step according to the docs and it doesn’t work. PITTY!! It sure would have been nice.
February 13, 2024 @ 10:33 am
To fix the 404 error, ensure that your ‘app url’ in the env file is a complete match to that of your website binding. Do not add a following ‘/’ at the end of the website path within the env, and it will get rid of the 404 error.
October 4, 2022 @ 1:44 am
How does the folder permissions affect security?
October 27, 2022 @ 6:37 am
Hello Jay,
Thank you very much for this great tutorial. I followed it and was able to successfully build my Snipe-IT server.
Now I am trying to configure Active Directory Sync and getting the error that I attached.
I also included a screenshot of my configuration.
Please any idea on why I am getting that error?
Thanks,
January 9, 2023 @ 10:40 pm
Hi Bro,
Am getting 500 I Server Error after the preflight
February 15, 2023 @ 6:51 am
Hi all,
new to this php stuff – can you tell me how to get around this issue?
March 13, 2023 @ 4:37 pm
Worked Well.. Thanks !!!
April 12, 2023 @ 6:26 am
So I followed all the steps and the database driver wouldn’t load. So I enabled all of the PHP extensions and preflight was all green but then it would give a 500 error and not go any further.
June 25, 2023 @ 6:55 pm
Dear Jay Singh
Please help!! I got error 500 while i do restore my backup file. How to solve the problem. thank
January 30, 2024 @ 7:38 pm
Hi Jay,
I am getting the following error. Please can you help?
Thanks
January 30, 2024 @ 11:41 pm
We followed this a few years back and got up and running straight away! Now it’s time to upgrade it to the latest version but no sure how to easily go about it so do you have a guide on upgrading for those of us that followed this guide? Thanks!
March 14, 2024 @ 6:11 pm
Dear sir,
Snipe it setup was successfully configured on my Ubuntu server.However, the URL is not working.It only works with local IP addresses or 120.0.1.1.I tried changing it to snipeit.example.com.It’s not working.Please let me know what’s wrong with my setup.
May 9, 2024 @ 4:25 am
Not sure if this is still active but can I use MySQL instead of MariaDB
June 1, 2024 @ 8:03 am
I needed to thank you for this excellent read!!
I definitely enjoyed every bit of it. I have
you book marked to check out new things you post…