
In this blog post, we will look at SNIPE-IT installation on Ubuntu Server with NGINX web server.
Last updated on 9th of March 2021
Check-out step-by-step video demonstration of SNIPE-IT installation.
Requirements for this guide to follow
- Ubuntu server up and running
- Static IP assigned to the server
- Internet connectivity
- Logged in with user account created during Ubuntu server installation or Root user (logging in as root not recommended)
Table of Contents
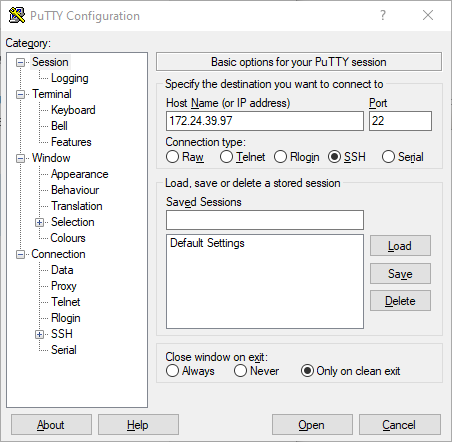
1. Connect to Ubuntu server
Highly recommend to use a SSH client for connectivity and it will make easy to copy/paste commands as compare to directly interacting with your Ubuntu server console.
I will be using Putty as SSH client. Here is the direct link to download Putty or you could use your preferred SSH client.
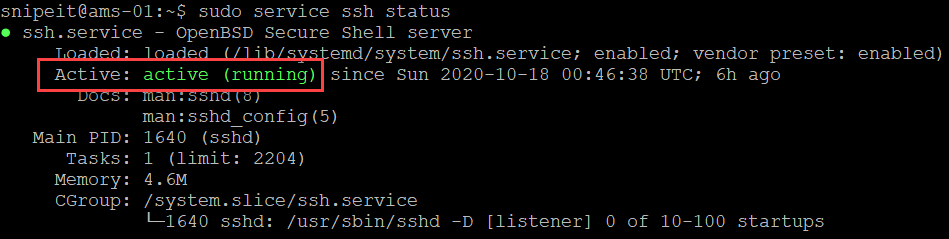
OpenSSH server status/installation
- OpenSSH is already installed. You can check SSH server status
sudo service ssh status
- If Open SSH server is not installed, you can install it by using the following commands:
sudo apt install OpenSSH-Server
- Verify Open SSH server status
sudo service ssh status
- Open SSH server’s configuration file is located here, file name is sshd_config. Open SSH should work out of the box, however, you can edit it if needed with your preferred choice of editor
cd /etc/ssh

2. Update/Upgrade installed packages
Update and upgrade installed packages on Ubuntu server. You will need to run this command as sudo and enter ‘y’ when prompted to confirm.
sudo apt update && sudo apt upgrade

3. Install NGINX, MySQL, PHP and PHP FPM
- Install NGINX
sudo apt install nginx
- Install MySQL
sudo apt install mysql-server
- Install PHP and PHP-FPM
sudo add-apt-repository universe
sudo apt install php-fpm php-mysql
Check versions
- MySQL server version
sudo mysql -V
- NGINX version
sudo nginx -V
- PHP Version
sudo php --version
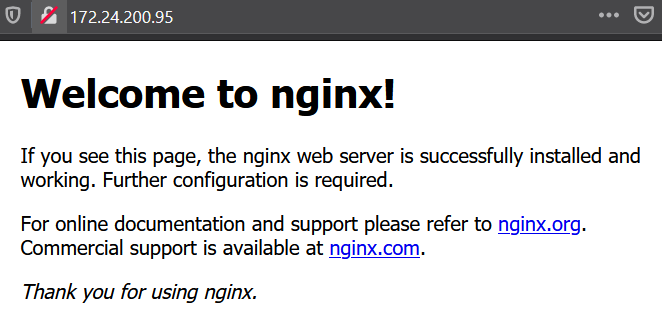
Test Installation
- NGINX: Browse to IP address of your server and you should see NGINX generic web page
- MySQL: Run the following command to see the status of MySQL Server
sudo service mysql status
4. Create a new site and test PHP
In this step, we will create a new site for Snipe-IT, disable default site and test php. Also, we will restart the relevant services. We will come back to this later and update the root folder once SNIPE-IT is downloaded.
- Create new site with name ams.teknex.com.au, you can update this name if you like to something else
sudo nano /etc/nginx/sites-available/ams.teknex.com.au
- Add site content as follows, update Directory if you download Snipe-IT in a different folder and Server Name to your Ubuntu Server’s IP address
server {
    listen 80;
    listen [::]:80;

    server_name  172.24.200.95;
    root   /var/www/html;
    index  index.php index.html index.htm;

    access_log /var/log/nginx/ams.teknex.com.au.access.log;
    error_log /var/log/nginx/ams.teknex.com.au.error.log;


    location / {
    try_files $uri $uri/ /index.php$is_args$args;
      }

    location ~ \.php$ {
         include snippets/fastcgi-php.conf;
         fastcgi_pass unix:/var/run/php/php7.4-fpm.sock;
         include fastcgi_params;
         fastcgi_param SCRIPT_FILENAME $document_root$fastcgi_script_name;
         fastcgi_intercept_errors on;
    }
}
| Line number | Config | Update |
| 5 | server_name | Enter your server’s IP Address/Host Name |
| 9 | access_log | Update name of your website |
| 10 | error_log | Update name of your website |
| 20 | location ~ \.php$ | Update PHP-FPM version in fastcgi_pass |
Easiest way to check PHP-FPM version is by typing the following in the terminal and hit tab. This should populate the value as shown below. For instance if your PHP-FPM version is 7.4 then enter the value as php7.4-fpm.
php-fpm
- Enable new site
sudo ln -s /etc/nginx/sites-available/ams.teknex.com.au /etc/nginx/sites-enabled/
- Disable default site
sudo unlink /etc/nginx/sites-enabled/default
- Restart Nginx
sudo service nginx restart
- PHP: Create a simple PHP page and browse to IP_Address/phpinfo.php
sudo bash -c "echo -e '<?php\nphpinfo();\n?>' > /var/www/html/phpinfo.php"
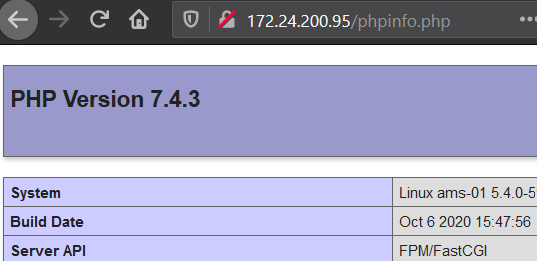
Do not proceed further if PHP is not working
5. Download Snipe-IT
Clone recent version of Snipe-IT from GIT into a local folder snipeit.
- Working directory is /var/www
cd /var/www/
- Clone Snipe-IT to local folder snipeit
sudo git clone https://github.com/snipe/snipe-it snipeit
- Make a copy of .env environmental file
cd /var/www/snipeit
sudo cp .env.example .env
- If you like, you can have a quick look inside the .env file with nano editor. We will come back to this file later on. Don’t make any changes to the file and use Ctrl + X to exit
sudo nano .env
6. Configure MySQL Server
Run MySQL secure installation command line wizard and secure the installation.
sudo mysql_secure_installation
- yes or no, if you would like to install Validate Password Plugin (I selected no for this in my lab environment)
- The next part offers you to change the password for the root of MySQL and enter password twice
- The next option to remove anonymous users, I will choose Yes
- The next option to stop root login remotely, I would go for no
- Reload privileges table: Yes
- You will see, “All done”, once it is all done
7. Create an initial database and a user
In this step, we will create database, user and grant specific privileges to new user.
| Database | snipeit_db |
| User | snipeit_user |
| Password | password |
- Login to MySQL server, provide password for MySQL root user when it prompts
sudo mysql -u root -p
- Create new database snipeit_db
CREATE DATABASE snipeit_db;
- Create new user snipeit_user
CREATE USER 'snipeit_user'@'localhost' IDENTIFIED BY 'password';
- Grant permissions to sipeit_user on database snipeit_db
GRANT ALL PRIVILEGES ON snipeit_db.* TO 'snipeit_user'@'localhost';
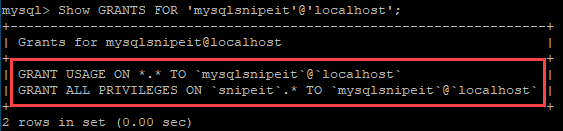
- Verify permissions
Show GRANTS FOR 'snipeit_user'@'localhost';
- Flush privileges
flush privileges;
- Quit
quit;
- Restart MySQL service
sudo service mysql restart
- Check MySQL service status
sudo service mysql status
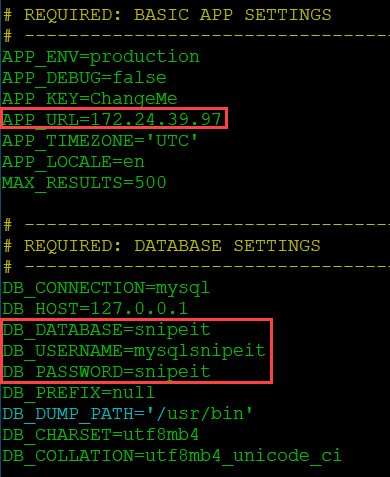
8. Update .env file
Let’s update .env file with the required information.
cd /var/www/snipeit
sudo nano .env
Update the following:
- App_URL
- DB_DATABASE
- DB_USERNAME
- DB_PASSWORD
9. Update folder permissions
Update folder permissions in the Snipe-IT root directory
- Working directory is /var/www/snipeit
cd /var/www/snipeit
- Update permissions
sudo chown -R www-data:www-data /var/www/snipeit/
sudo chmod -R 755 storage
sudo chmod -R 755 public/uploads
10. Download Composer
Working directory is logged in user’s home directory. In my case it is /home/snipeit
sudo curl -sS https://getcomposer.org/installer | php
sudo mv composer.phar /usr/local/bin/composer
11. Install PHP dependencies
There are a number of PHP dependencies, ensure these all are successfully installed.
Working directory: Home directory of logged in user
sudo add-apt-repository universe
sudo apt-get install -y git unzip php php-curl php-mysql php-gd php-ldap php-zip php-mbstring php-xml php-bcmath php-tokenizer
12. Install Composer
Working directory: /var/www/snipeit
cd /var/www/snipeit
sudo composer install --no-dev --prefer-source
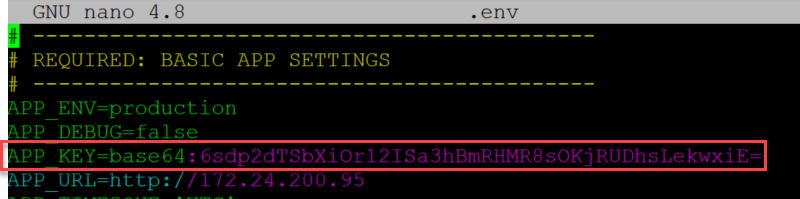
13. Generate App Key for .env file
Run the following command and enter yes when prompted
sudo php artisan key:generate
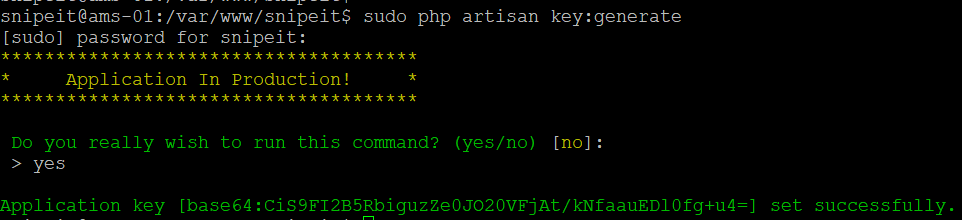
Verify the key generation
Open .env file and check APP_KEY value
sudo nano .env
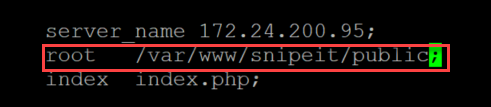
14. Update Snipe-IT site
We created a site earlier and in this step we will update the root folder.
sudo nano /etc/nginx/sites-available/ams.teknex.com.au
Update the root to the following:
/var/www/snipeit/public
Restart the web server
sudo service nginx restart
15. Snipe-IT pre-flight setup
Browse to IP address of your Ubuntu server and you should see the pre-flight page. Follow the prompts and you are done!!
Your feedback is important for us and other users. Leave it in the comments how did you go with your setup 🙂


March 30, 2021 @ 2:32 pm
June 1, 2021 @ 3:37 pm
Hi Jay!
Thanks for the tutorial. I really enjoy your teaching style. Concise, to the point, and easy to understand. And your blog is phenomenal. Appreciate your work
June 2, 2021 @ 5:16 pm
Hi Val,
You are welcome. I am glad you find my videos and tutorial helpful.
Cheers!
Jay
July 8, 2021 @ 3:47 pm
I installed snipe-it together with zabbix so I cannot go to last step. is there any link to go to pre flight?
July 8, 2021 @ 6:01 pm
your_ip_address/setup is the direct link to pre-flight.
If both services are running on the same port, then there will be an issue.
July 8, 2021 @ 6:35 pm
yeah, same port 80. Hurm
August 18, 2021 @ 10:59 pm
me dice error en el server
August 19, 2021 @ 12:21 am
Very userful and well done tutorial and explanations. Thanks.
Can I install it on win 10, but isnt server? Cheers!
September 15, 2021 @ 5:12 am
Hi Jay, Thanks, it is a great tutorial…
September 15, 2021 @ 4:22 pm
Glad to hear you find it helpful.
October 26, 2021 @ 8:31 pm
I am installed SnipeIT on my Ubuntu 20 server. suddenly I can’t login with any user or admin credentials. what is this issue? I have checked on my mysql DB but in the users table I can see only admin name but also I could not login with admin credentials. ? I am fed up.
October 29, 2021 @ 11:21 am
Hey, Great video and tutorial, would you mind doing one where you update an existing system, would the php upgrade.php command work? after using your steps?
thanks
November 1, 2021 @ 1:26 pm
I have not tested it.
You might have to change the permissions on some specific files in order to achieve the upgrade.
November 30, 2021 @ 12:02 am
Nice tutorial Jay.
November 30, 2021 @ 7:20 pm
Thanks for the feedback.
December 9, 2021 @ 9:34 pm
Really nice one…More Useful.. Thanks for the video
February 25, 2022 @ 4:02 pm
Thanks for the blog, It’s helpful & really working.
March 2, 2022 @ 8:12 pm
hey i have error
500 Server Error
can you help me
March 18, 2022 @ 9:40 am
I’m getting 500 server error too. I’ve checked everything. Document root is as specified in the tutorial. :-/
March 18, 2022 @ 10:29 am
I found the problem. In his tutorial, if you used the information in his screenshot, that was different from the commands that created the snipeit database and username. If you used the same information provided in this tutorial when setting up snipe IT, then apply the following to correct the issue.
cd /var/www/snipeit
sudo nano .env
Change:
DB_DATABASE=snipeit
DB_USERNAME=mysqlsnipeit
To this:
DB_DATABASE=snipeit_db
DB_USERNAME=snipeit_user
Ctrl + Shift + x and Y to save the changes.
sudo service mysql restart
sudo service nginx restart
Open a browser and hit your IP. You should get the pre-flight page. Hope this helps someone!
April 8, 2022 @ 5:02 am
I figured out why for anyone else having this issue. Edit the below and make sure you have the IP address entered in. As well for the .env the full http://<ipv4 or FQDN>:
sudo nano /etc/nginx/sites-available/<site-name>
March 5, 2022 @ 9:03 am
April 7, 2022 @ 6:25 am
I am getting the 500 Server Error after I complete all the steps on ubuntu server 20.04 LTS. Following other tutorials using Centos 7, AlmaLinux and Ubuntu desktop 20.04 I get the same error. I never get the pre-flight check page.
May 22, 2022 @ 11:46 am
I had these issues after an upgrade. Check out their shell that changes permissions https://snipe-it.readme.io/docs/debugging-permissions. I did that and the site loaded right up. What’s weird, is their documentation gives read/write to apache to all files. (Actually this tutorial here gives read write execute because apache is the owner, that seems even more weird to me)
July 15, 2022 @ 8:22 am
This worked for me, thanks
May 4, 2022 @ 11:20 am
I’m unable to generate the key. Tried all the possible ways…
July 5, 2022 @ 2:14 pm
i completed 15 steps, but when I load site show error ??
Fatal error: Uncaught ErrorException: file_put_contents(/var/www/www-root/data/www/findmyphone.today/storage/framework/cache/cf/90/cf906e7195218453e4ff6f1bdcdc6b2d9f6cae71): failed to open stream: No such file or directory in /var/www/www-root/data/www/findmyphone.today/vendor/laravel/framework/src/Illuminate/Filesystem/Filesystem.php:187 Stack trace: #0 [internal function]: Illuminate\Foundation\Bootstrap\HandleExceptions->handleError(2, ‘file_put_conten…’, ‘/var/www/www-ro…’, 187, Array) #1 /var/www/www-root/data/www/findmyphone.today/vendor/laravel/framework/src/Illuminate/Filesystem/Filesystem.php(187): file_put_contents(‘/var/www/www-ro…’, ‘9999999999N;’, 2) #2 /var/www/www-root/data/www/findmyphone.today/vendor/laravel/framework/src/Illuminate/Cache/FileStore.php(77): Illuminate\Filesystem\Filesystem->put(‘/var/www/www-ro…’, ‘9999999999N;’, true) #3 /var/www/www-root/data/www/findmyphone.today/vendor/laravel/framework/src/Illuminate/Cache/FileStore.php(200): Illuminate\Cache\FileStore->put(‘snipeit_app_set.. in /var/www/www-root/data/www/findmyphone.today/vendor/laravel/framework/src/Illuminate/Filesystem/Filesystem.php on line 187
Fatal error: Uncaught ErrorException: file_put_contents(/var/www/www-root/data/www/findmyphone.today/storage/framework/cache/cf/90/cf906e7195218453e4ff6f1bdcdc6b2d9f6cae71): failed to open stream: No such file or directory in /var/www/www-root/data/www/findmyphone.today/vendor/laravel/framework/src/Illuminate/Filesystem/Filesystem.php:187 Stack trace: #0 [internal function]: Illuminate\Foundation\Bootstrap\HandleExceptions->handleError(2, ‘file_put_conten…’, ‘/var/www/www-ro…’, 187, Array) #1 /var/www/www-root/data/www/findmyphone.today/vendor/laravel/framework/src/Illuminate/Filesystem/Filesystem.php(187): file_put_contents(‘/var/www/www-ro…’, ‘9999999999N;’, 2) #2 /var/www/www-root/data/www/findmyphone.today/vendor/laravel/framework/src/Illuminate/Cache/FileStore.php(77): Illuminate\Filesystem\Filesystem->put(‘/var/www/www-ro…’, ‘9999999999N;’, true) #3 /var/www/www-root/data/www/findmyphone.today/vendor/laravel/framework/src/Illuminate/Cache/FileStore.php(200): Illuminate\Cache\FileStore->put(‘snipeit_app_set.. in /var/www/www-root/data/www/findmyphone.today/vendor/laravel/framework/src/Illuminate/Filesystem/Filesystem.php on line 187
November 18, 2022 @ 7:55 pm
Hi Jay.. I was stuck installing Snipeit. unable to clone from github. at the 5 th point. pls do assist.
April 8, 2023 @ 6:07 am
Connecting to MySQL using a blank password.
VALIDATE PASSWORD COMPONENT can be used to test passwords
and improve security. It checks the strength of password
and allows the users to set only those passwords which are
secure enough. Would you like to setup VALIDATE PASSWORD component?
Press y|Y for Yes, any other key for No:
Please set the password for root here.
New password:
Re-enter new password:
… Failed! Error: SET PASSWORD has no significance for user ‘root’@’localhost’ as the authentication method used doesn’t store authentication data in the MySQL server. Please consider using ALTER USER instead if you want to change authentication parameters.
February 7, 2024 @ 1:15 am
very informative articles or reviews at this time.
February 15, 2024 @ 7:38 am
Nice post. I learn something totally new and challenging on websites
February 17, 2024 @ 2:36 am
I like the efforts you have put in this, regards for all the great content.
May 3, 2024 @ 10:00 am
I’m often to blogging and i really appreciate your content. The article has actually peaks my interest. I’m going to bookmark your web site and maintain checking for brand spanking new information.
May 5, 2024 @ 8:59 am
Hi there to all, for the reason that I am genuinely keen of reading this website’s post to be updated on a regular basis. It carries pleasant stuff.
May 6, 2024 @ 9:56 pm
This was beautiful Admin. Thank you for your reflections.
May 7, 2024 @ 10:54 am
I just like the helpful information you provide in your articles
May 7, 2024 @ 11:44 pm
Pretty! This has been a really wonderful post. Many thanks for providing these details.
May 8, 2024 @ 12:34 am
I do not even understand how I ended up here, but I assumed this publish used to be great
May 31, 2024 @ 7:50 am
Right here is the perfect site for anyone who
really wants to understand this topic. You understand so
much its almost hard to argue with you (not that I actually would want
to…HaHa). You certainly put a new spin on a topic that has been discussed
for years. Wonderful stuff, just great!