
In production, you will definitely use physical drives considering performance and other factors like backup and restoration. However, we will mimic production environment in our lab with the help of virtual drives. It gives you the feel and same look as production, and gives you a clear picture where specific data is stored.
Last updated 09/05/2021
Check-out related video to this blog post
Table of Contents
1. Storage configuration for ConfigMgr VM
Here is the what I recommend minimum storage for different drives. If you could afford more, definitely go ahead with that.
| Drive | Storage Name | Size | Comments |
|---|---|---|---|
| C:\ | Local Disk | 50 GB | OS, SQL Server Installation, ADK |
| D:\ | CM_Install | 40 GB | Configuration Manager Installation, MP |
| E:\ | CM_TempDB | 20 GB | SQL Server Data Services Engine TempDB |
| F:\ | Content_Library | 40 GB | DP, WSUS Content |
| G:\ | WSUS_Database | 20 GB | WSUS Database |
| H:\ | CM_SQL_MDF | 20 GB | ConfigMgr Database |
| I:\ | CM_SQL_LDF | 20 GB | ConfigMgr Log Files |
| File Share | CM_ContentSource | 20 GB | Source files for Applications/Packages deployment |
| Total | 250 GB |
2. Configure Drives
Drive C
This drive will already be configured during OS installation on TEKNEX-CM01. No further action will be required.
Drive D
Configuration Manager and Management Point role will be installed on this drive. It will be formatted as a standard NTFS volume.
Steps to create a new VHD, attach to the Virtual Machine and format it as per the requirements.
- Open Hyper-V Manager > Select your ConfigMgr VM (TEKNEX-CM01 in my case) > Right-click and select Settings
- In the Settings Wizard select SCSI Controller > click on Add to add a hard drive
- Select New and this will open New Virtual Hard Disk Wizard
- Click Next on the Before You begin page
- Keep default selection dynamically expanding and select Next
- Specify name and location where you would like to save the virtual drive
- Enter size in GB and click finish
Once VHD is created and attached to the ConfigMgr VM, next thing is to format the volume.
- Login to ConfigMgr server and open Server Manager > Select File and Storage Services > Disks
- Select the drive you recently attached, which will be marked offline > right-click and click bring online > click Yes when prompted
- Disk will be online > select the disk and right-click > click New Volume and this will open New Volume wizard
- Server and Disk will be listed on the next page > click Next and select OK if prompted to bring the disk online
- Maximum volume size will be listed and select Next
- Select Drive letter (I am selecting D as I documented) for this disk and click Next
- On the Select file system settings page, update the following:
– File system: NTFS (keep default)
– Allocation unit size: Default (unless it is mentioned specifically)
– Volume label: CM_Install (update accordingly) - Click Create on the Confirmation page
- Open File Explorer and check the new drive
Follow the above steps mentioned to create and attach the following drives to ConfigMgr server.
Drive E
SQL Server Data Services Engine TempDB files will be saved on this drive.
Important: Microsoft recommends to format this as 64KB size (update step 7 allocation unit size while formatting this drive). Name the volume to CM_TempDB so that it can be differentiated in the File Explorer.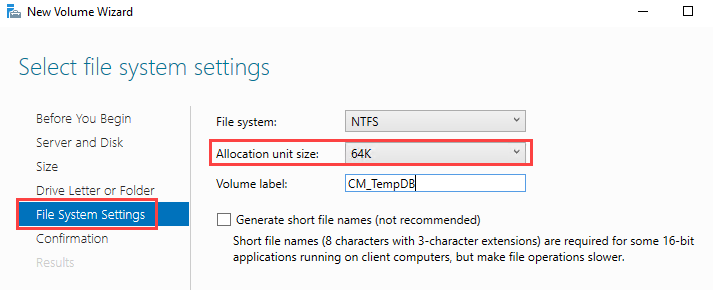
Drive F
Content Library will be saved on this drive and WSUS content. It will be formatted as a standard NTFS volume. Name the volume to Content_Library so that it can be differentiated in the File Explorer.
Drive G
WSUS database will be saved on this drive. It will be formatted as a standard NTFS volume. Name the volume to WSUS_Database so that it can be differentiated in the File Explorer.
Drive H
ConfigMgr database will be saved on this drive. It will be formatted as a standard NTFS volume. Name the volume to CM_SQL_MDF so that it can be differentiated in the File Explorer.
Important: Microsoft recommends to format this as 64KB size. Ensure to select 64 K Allocation Unit Size for Drive H.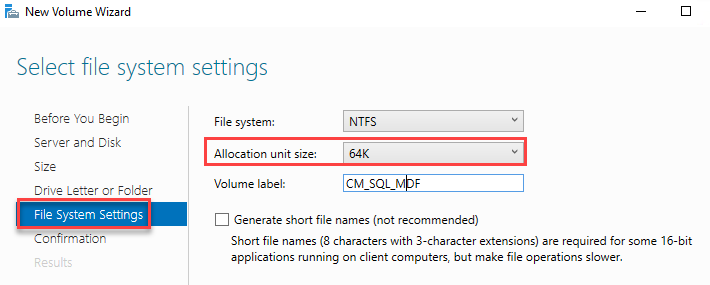
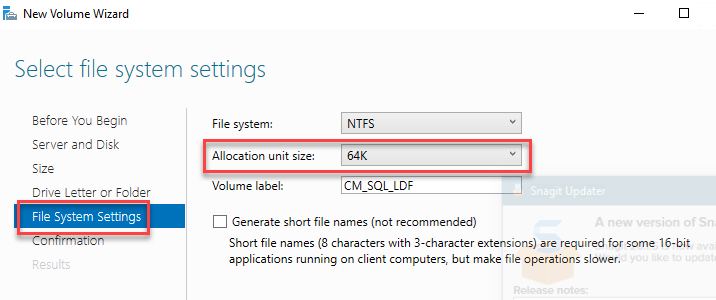
Drive I
ConfigMgr database log files will be saved on this drive. Name the volume to CM_SQL_LDF so that it can be differentiated in the File Explorer.
Important: Microsoft recommends to format this as 64KB size. Ensure to select 64 K Allocation Unit Size for Drive H.
File Share
This drive will be used to save applications and packages content. It will be formatted as a standard NTFS volume. Name the volume to CM_ContentSource so that it can be differentiated in the File Explorer.
Your feedback is important to me. Leave it in the comments below 😃.


November 13, 2020 @ 8:24 pm
Hi, I was just wondering about the purpose of CM_ContentSource. In the video, we created it as a drive on the CM server. But is this the drive you would typically want in a fileserver and share it and where you would typically keep applications, packages, drivers, driver packages and so on?
November 16, 2020 @ 1:25 pm
Hi Nadir,
I agree with you.
As you may know, we do not have any dedicated file server in action in the lab. This is the reason why we just utilize ConfigMgr server to do this additional task. Definitely, you would go for a dedicated file server in production.
I will update the blog and add those comments.
Jay
November 16, 2020 @ 6:18 pm
Ok perfect and thanks! I love your videos btw, I think you are doing a great job!
April 30, 2022 @ 4:56 am
Jay, what kind of share and security rights need to be setup on any of these drives that are created? Do you have to manually set those or does the MECM install do that for you? Just wondering what’s best practice as I ran into permissions issues according to the logs after I did my first install. I have since wiped it all, and am starting again. Thanks for any advice on this.